Can we have a quiet word about the kitchen island arms race? You know what I’m talking about. Everyone seems to be in a competition to install the largest possible slab of stone in their kitchen, often creating something that resembles an aircraft carrier more than a functional part of a home. A client of mine, a truly lovely man from Kent, was so proud of his gargantuan island that it took him a full week to realise he’d essentially built a stylish barricade between his sink and his refrigerator. He couldn’t open the dishwasher and the oven door at the same time. It was ghastly.
The real secret to a perfect island isn’t about sheer size; it’s about proportion, flow, and purpose—a very British sensibility, I might add. It has to feel right within the room, working with you rather than against you. So, before you get swept away by glossy pictures of sprawling islands in houses the size of a small duchy, let’s talk about what actually matters. This is the real story, the sort of advice I’d give you over a cup of tea, or perhaps something a little stronger.
Foundational Planning & Layout Essentials
Before you even dream of a single swatch of marble or a whisper of walnut, we must do the terribly un-sexy but utterly essential work. This is the tailoring of your kitchen’s suit—get the measurements wrong, and no amount of beautiful fabric can save it. This is where people go wrong, and where we, my friend, shall not.
1. Calculate Optimal Countertop Dimensions for Island Flow
You know what people always ask me? “How big can my island be?” It’s the wrong question. The right question is, “How big should my island be to make my life easier?” The goal isn’t to cram in the largest possible surface, but to create a space that breathes. You need to be able to perform what I call the “kitchen waltz”—moving between stove, sink, and fridge without bumping into things or, heaven forbid, another person. An oversized island is the single fastest way to create daily, low-grade irritation.
A common bit of nonsense is focusing only on the countertop space itself. But what truly matters is the space around it. Those clever Americans at the National Kitchen & Bath Association suggest at least 42 inches (about 107 cm) for a walkway, and I quite agree. Before you commit, I beg you, use cardboard boxes or painter’s tape to create a mock-up on your floor. Live with it for a day. Try to open your oven. See if you can unload the dishwasher without contorting yourself. This simple trick has saved more clients from costly disasters than I can count.
With the proper dimensions sketched out, we can now discuss the rather delicate subject of money.
2. Set a Realistic Budget for Kitchen Island Material Choices
Right, let’s talk about money without being vulgar. It’s absolutely essential to set a budget before you fall in love with a slab of Calacatta viola that costs more than a small car. The sticker price per square foot is pure corporate speak—it’s designed to lure you in. What they don’t tell you is that the final cost can balloon by 30-50% once you add fabrication, edge profiles, sink cut-outs, and installation. It’s terribly sneaky.
A shortcut I wish I’d known earlier? Treat it like any significant project and build in a 10-15% contingency fund from the very start. This isn’t being pessimistic; it’s being Britishly pragmatic. It’s the financial equivalent of bringing an umbrella on a sunny day. This fund will absorb those unforeseen costs—like needing extra support for a heavy stone slab—and save you from that gut-wrenching choice between the countertop you love and, well, eating for the next month. Get at least three fully itemised quotes before you sign anything.
Once you know what you can afford, we can consider how to sit at this island without developing back problems.
3. Evaluate Island Countertop Overhang for Comfortable Seating
I confess, I once thought overhang was a simple measurement. Then I spent an entire dinner party with my knees jammed against unforgiving cabinetry, perched on a stool like a nervous sparrow. I learned the hard way that an insufficient overhang is a design crime. It renders your beautiful seating area utterly useless because no one, and I mean no one, enjoys sitting hunched over their plate. It’s just not civilized.
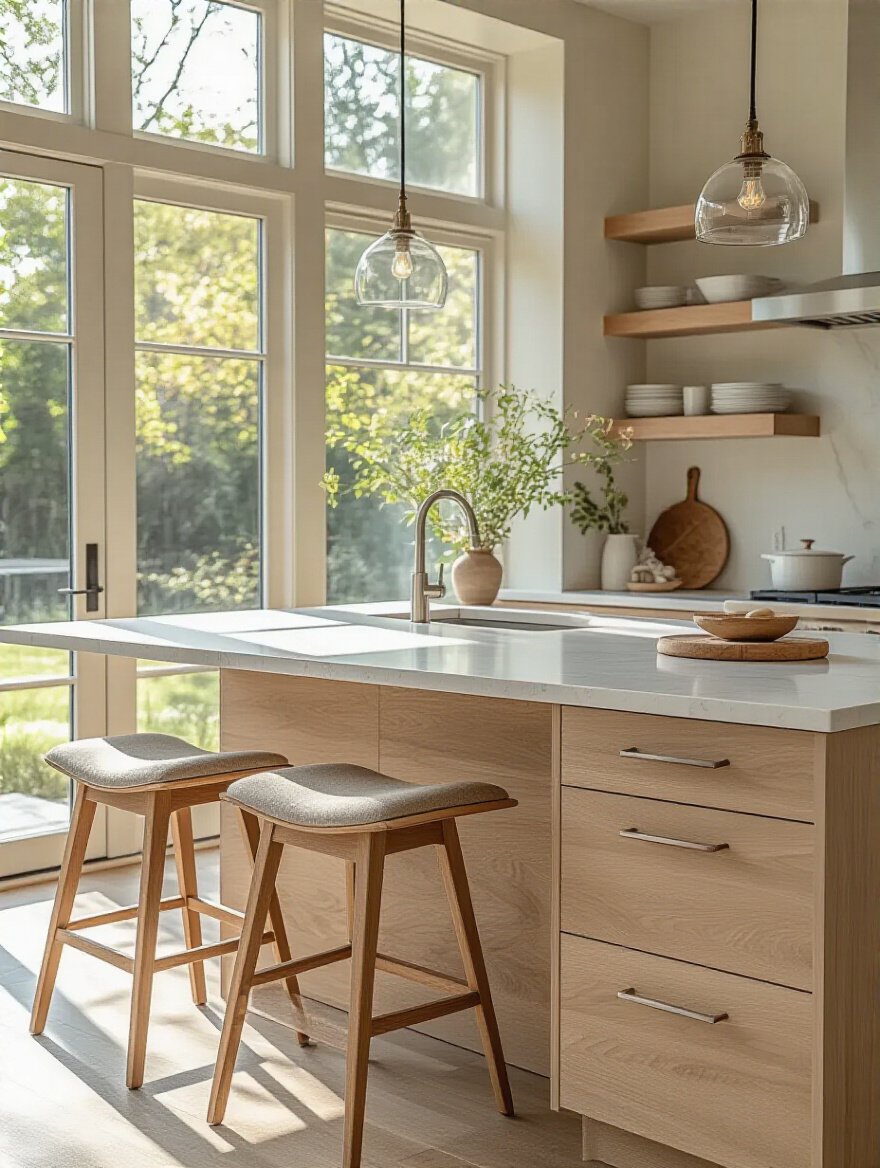
The noise you’ll hear is a one-size-fits-all number. The truth is, it depends on the height. For a standard 36-inch counter-height island, you need a minimum of 15 inches of clear knee space. Don’t let anyone tell you 10 or 12 is “fine.” It’s not. For taller bar-height islands, you can get away with a bit less, say 12 inches. And don’t forget the supports! For heavy stone, anything over 10 inches needs proper steel brackets, not just some decorative corbels. You want a place to rest a G&T, not a liability.
With comfort taken care of, let’s determine what on earth you’ll actually be doing at this island.
4. Determine Kitchen Island Functionality Needs: Prep, Dining, or Sink Integration
I’ve noticed something peculiar lately: people want an island because they feel they should have one, without a clear idea of its purpose. It becomes a magnificent, expensive clutter-magnet. So, you must ask yourself, what is its primary role in the great theatre of your kitchen? Is it a stage for serious culinary prep? A casual spot for the children’s homework and a quick supper? Or a cleanup station with an integrated sink? You can’t have it all without making serious compromises.
The common mistake is trying to cram everything in. A sink, a cooktop, and seating for six on an island the size of a postage stamp. It’s a recipe for chaos. The shortcut here is to prioritize brutally. Pick one or, at most, two primary functions. If it’s for prep, you want a long, uninterrupted surface. If a sink is involved, remember you need “landing zones”—at least 18 inches of clear counter on either side. A prep sink can be a godsend, but a main sink in the island often means a perpetual view of dirty dishes. Choose wisely.
Once its function is set, we must ensure you can actually move around it.
5. Ensure Adequate Walkway Clearances Around Your Island Countertop
This brings us back to my client with the kitchen barricade. The mistake is to see the floor plan as a 2D drawing. But a kitchen is a three-dimensional space of constant motion. People walk, doors swing open, children and pets appear from nowhere. Forgetting to account for this turns a beautiful kitchen into a daily frustration. It’s like choreographing a ballet in a broom cupboard—it simply doesn’t work.
What really matters is dynamic clearance. A 42-inch walkway might seem ample, but is it still 42 inches when the dishwasher door is open? Or when someone is sitting on a stool? No. The shortcut is to think in terms of activity, not just space. An aisle with an oven or dishwasher needs more room—think 48 inches. I once watched a client nearly take out their spouse with a hot oven door because their island was just six inches too close. It’s about safety and grace, not just ticking a box on a checklist.
With the foundations properly laid, we can finally turn to the delightful part: choosing the materials.
Selecting Your Ideal Material & Design Aesthetics
This is where your kitchen’s personality truly comes to life. The material you choose for your island countertop is the equivalent of a perfectly chosen oil painting in a drawing room—it sets the tone for everything. Let’s navigate the most popular choices, shall we?
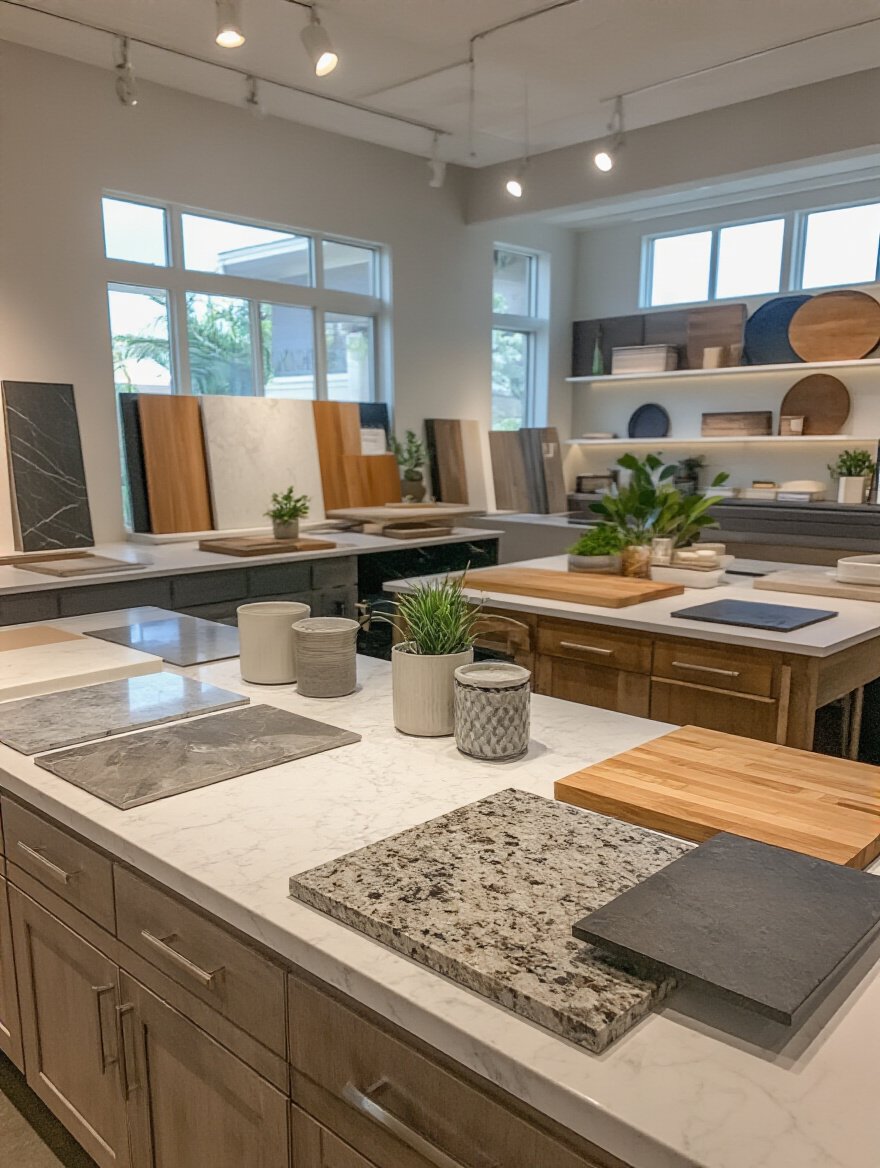
6. Compare Granite vs. Quartz: Durability, Cost, and Aesthetics
The granite versus quartz debate is a bit like choosing between a romantic, brooding hero from a Brontë novel and a dashing, dependable gentleman from a Jane Austen story. Granite is nature’s art—each slab is a unique, wild, unrepeatable masterpiece, complete with fissures and eccentricities. It has a soul. But it’s also porous, meaning it needs sealing to guard against the horrors of a spilled glass of Malbec.
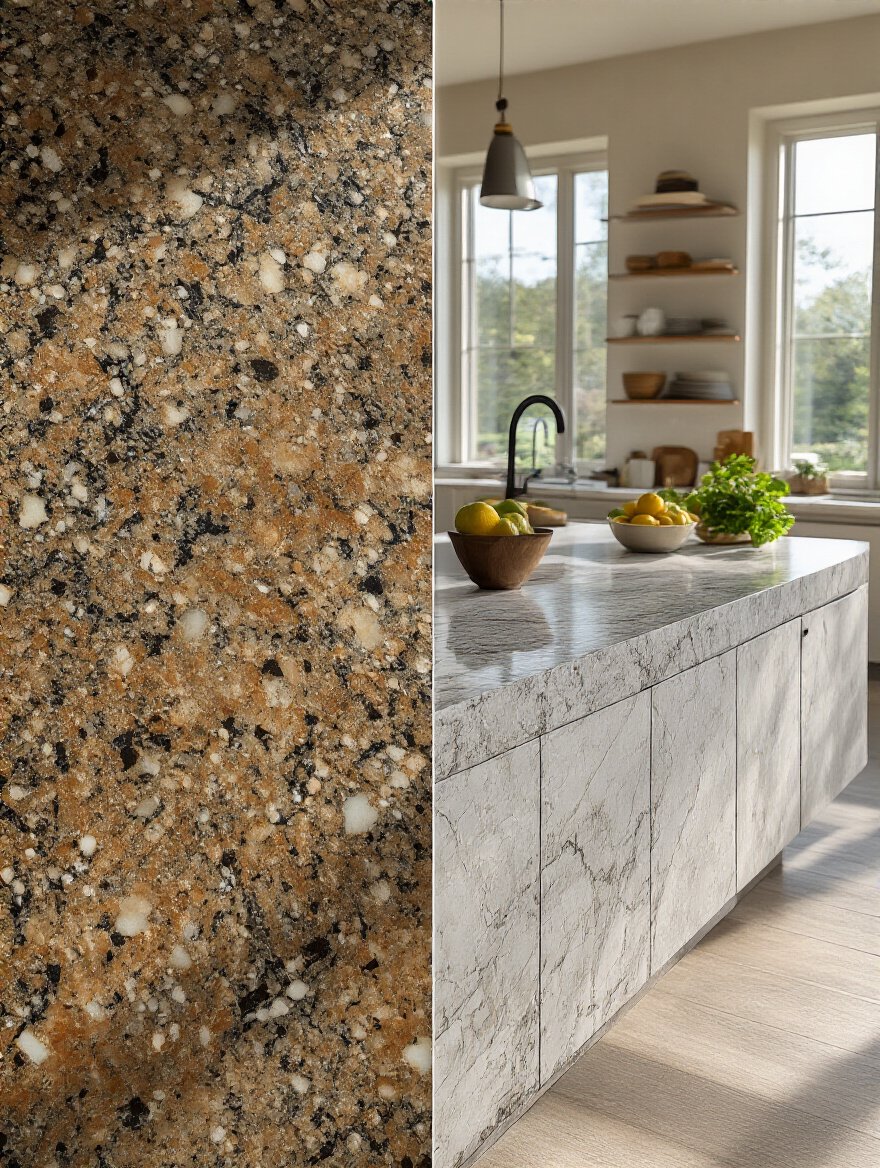
Quartz, on the other hand, is the engineered ideal. It’s consistent, non-porous, and practically bomb-proof. It can mimic the look of marble without the high-maintenance drama. Everyone will tell you quartz is “better,” but that’s rubbish. It’s not better, it’s just different. The shortcut I always tell clients is this: If you are a person who delights in uniqueness and can tolerate a bit of character-building maintenance, go for granite. If you crave predictability and a surface that can withstand the joyful chaos of family life with zero fuss, quartz is your man.
But what if you yearn for something warmer, with a bit more history in its grain?
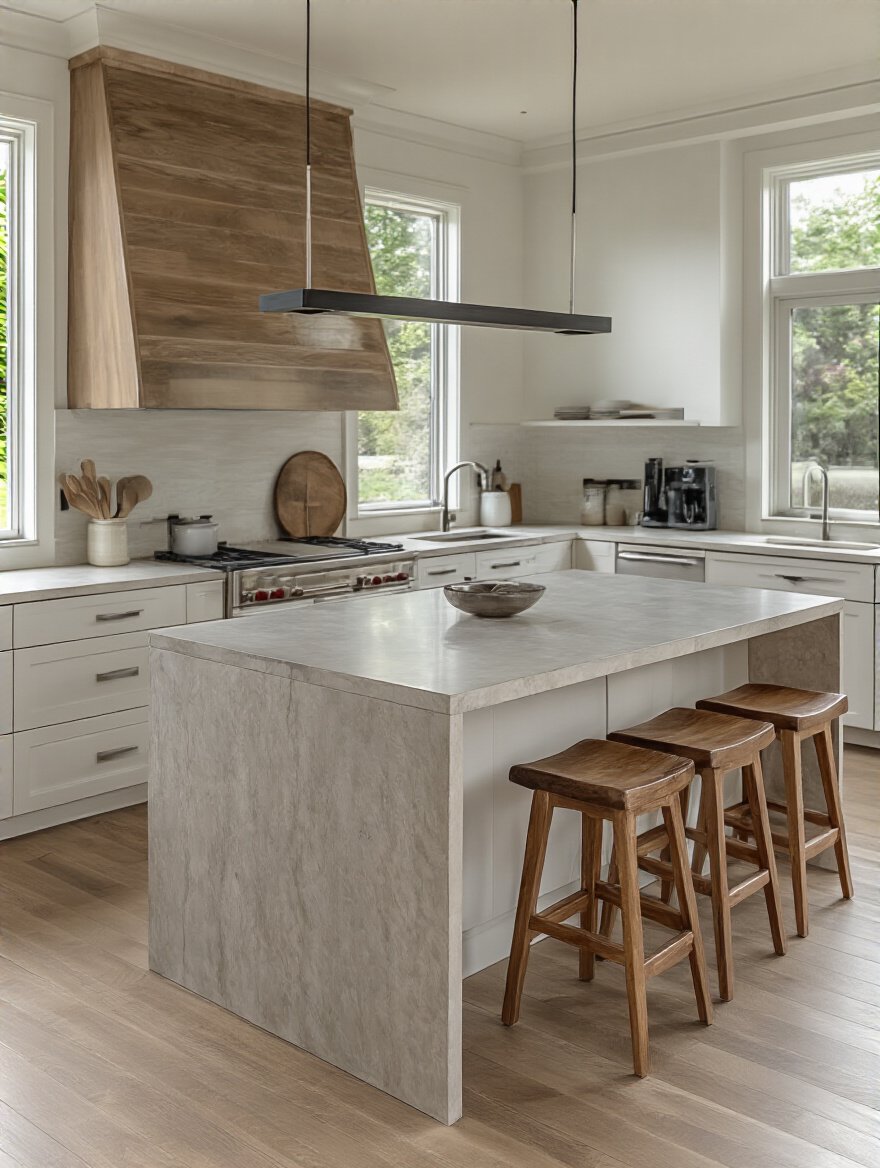
7. Explore butcher block countertops for Warmth and Timeless Charm
There is something undeniably comforting about a butcher block island. It has the warm, honest soul of an old country pub or a well-loved baker’s table. I confess, I adore it. It introduces a soft, organic element that stops a kitchen from feeling too clinical or hard-edged. And the best part? It’s forgiving. Unlike stone, which chips with a sickening finality, a butcher block wears its history with pride.
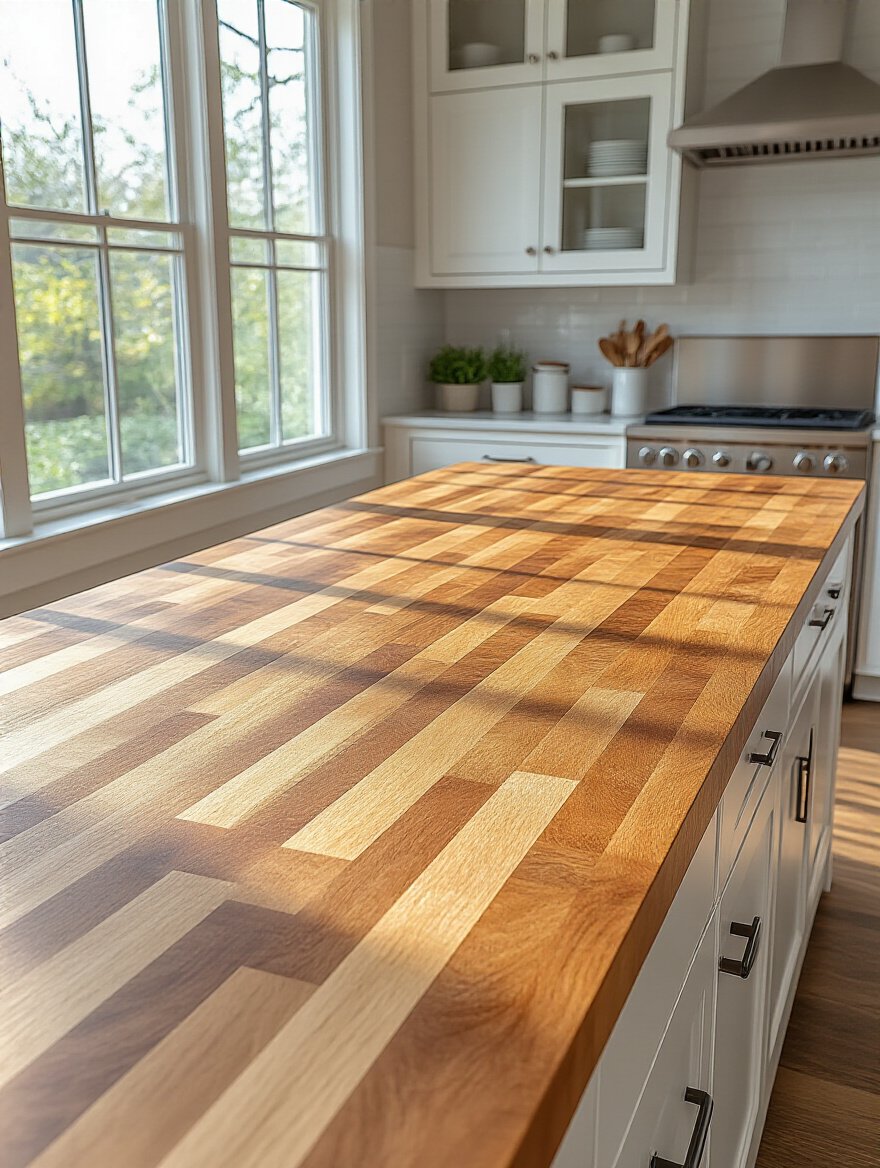
Everyone frets about maintenance, but here’s what they get wrong: a bit of mineral oil now and then is a pleasure, not a chore. It’s a five-minute ritual that keeps the wood glowing. And should the worst happen—a scratch, a scorch mark—you can simply sand it away. I once took a nasty knife gouge out of my own butcher block prep station; the satisfaction of restoring it myself was immense. It’s a living surface, one that gets better with age and tells the story of the meals and memories made upon it.
Of course, for those with a more avant-garde streak, there are other paths to take.
8. Discover Concrete & Soapstone: Unique Looks with Specific Care
Now we’re talking. If you find granite a bit provincial and quartz a tad soulless, then perhaps a more adventurous material is in order. Concrete is Brutalist chic, a custom-poured sculpture that can be tinted and textured into something utterly unique. It’s for the bold. But be warned: it will develop hairline cracks and a patina. You must be the sort of person who finds this charmingly wabi-sabi, not flawed.
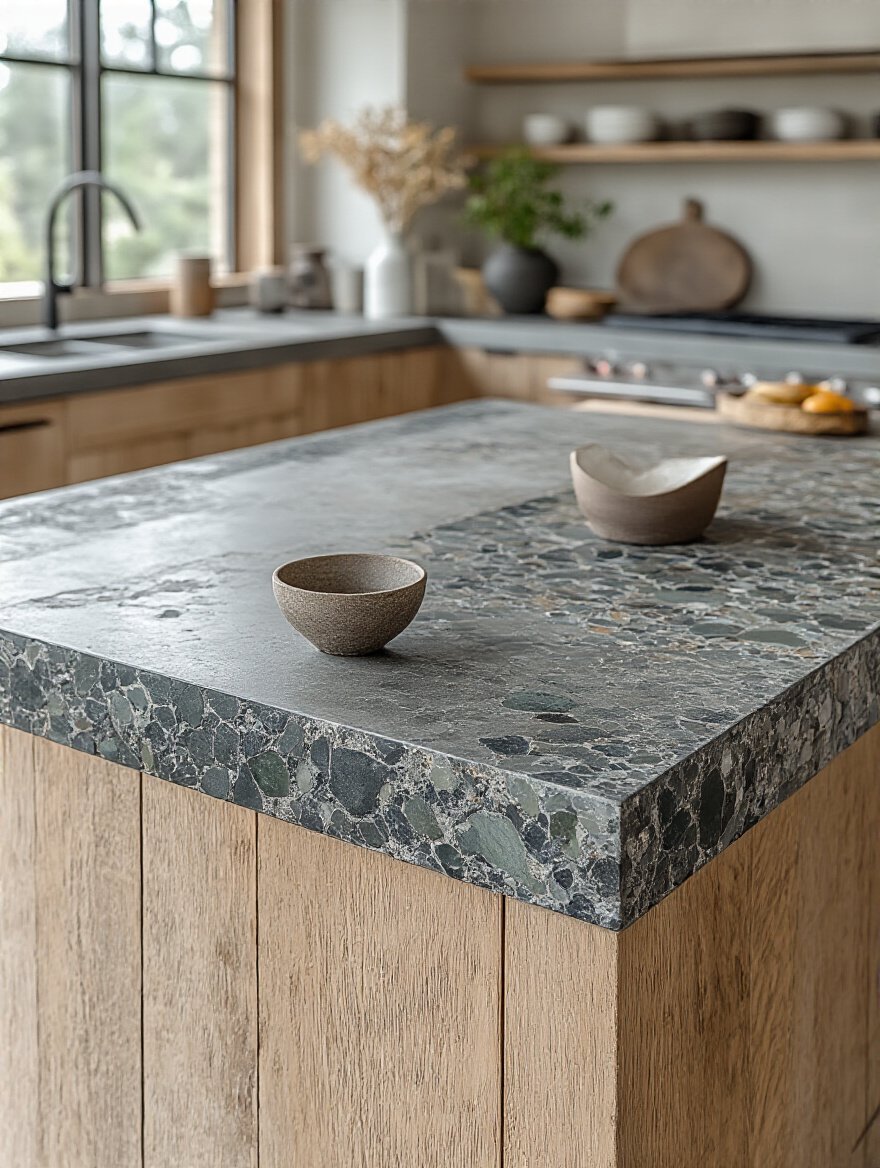
Soapstone is its quieter, moodier cousin. It has a soft, velvety feel and a deep, cloudy grey colour that darkens over time with oiling. I love it. Its main superpower is being impervious to heat, but its kryptonite is its softness—it will scratch. Everyone says this is a flaw, but I call it a living finish. Every mark tells a story. The real secret to loving either of these is to embrace their imperfections as part of their character. If you demand pristine perfection, look elsewhere.
With the material decided, we must consider the finishing touch.
9. Choose the Perfect Edge Profile to Enhance Island Style and Safety
The edge of your countertop is like the cuff of a well-made shirt—a small detail that speaks volumes about quality and intention. People often overlook it, choosing a standard edge without a thought. What a missed opportunity! A sharp, squared-off edge can look wonderfully minimalist, but I once had a client whose toddler ran headlong into one. After that, I became a firm believer in the power of a softly rounded “eased” or “bullnose” edge, especially in a family home.

The bit of jargon to ignore is the endless list of fancy, fussy names. What matters is the answer to two questions: Does it fit my style? And is it going to injure someone? A simple, eased edge is timeless and safe. An intricate Ogee edge looks lovely in a very traditional, formal kitchen but can be a nightmare to clean, trapping crumbs in its crevices. The shortcut is to think practically. A softer, rounded profile is generally more durable, as it’s less likely to chip than a sharp, 90-degree corner.
Now for the high-stakes game of colour.
10. Master Contrasting or Coordinating Island Countertop Colors for Impact
Are you creating a serene symphony or a moment of delightful tension? That’s the core question here. A coordinating island, one that matches the perimeter countertops, creates a calm, cohesive, and seamless look. It’s elegant and understated. A contrasting island, however, is a statement. It’s the “look at me” piece of furniture in the room, a dramatic focal point. Think of a dark, moody soapstone island in an otherwise all-white kitchen. The impact is undeniable.

The BS to ignore is the idea that there’s a “right” answer. The only right answer is the one that achieves your desired effect. The shortcut is the classic designer’s 60-30-10 rule. Let your main cabinetry be 60% of your colour palette, your island (cabinets and/or countertop) be the 30% secondary colour, and then use your final 10% for accents like hardware and lighting. This simple formula helps ensure your contrast feels intentional and balanced, rather than accidental.
And for the ultimate dramatic statement, we have the waterfall.
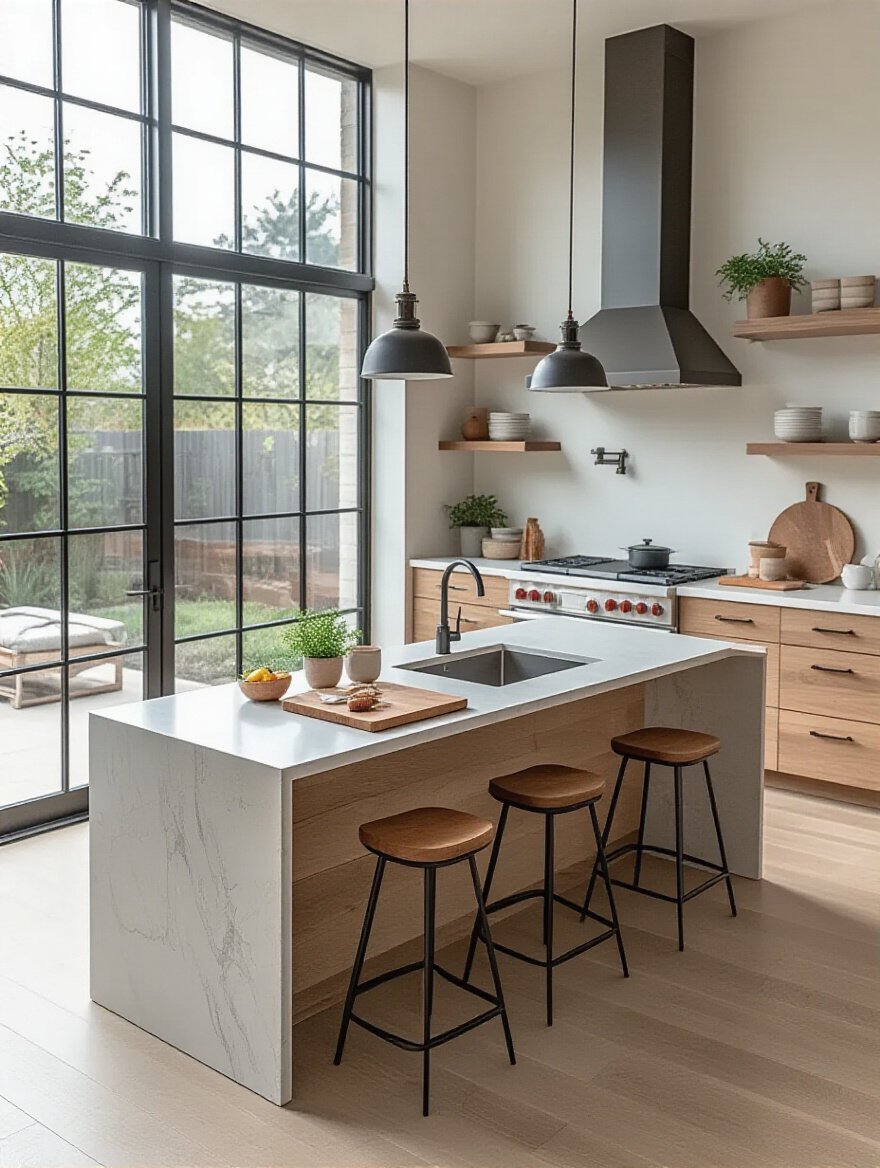
11. Implement a Waterfall Edge for a Seamless, Modern Countertop Statement
Ah, the waterfall edge. It’s the design equivalent of a sharp, tailored tuxedo—unapologetically dramatic, modern, and luxurious. It’s where the countertop material flows vertically down the sides of the island to the floor, creating a seamless, monolithic sculpture. It’s a breathtaking way to showcase a particularly beautiful slab of stone with dramatic veining.

However, here’s what can go horribly wrong: the seam. The success of a waterfall edge rests entirely on a perfectly mitered joint where the horizontal and vertical planes meet. A clumsy, visible seam completely ruins the illusion and looks cheap. This is not a job for your average fabricator. You need a true artisan. I learned this the hard way on an early project where the fabricator’s “nearly invisible” seam was, in fact, glaringly obvious. Insist on seeing examples of their mitered edge work before you hire them.
Beyond the aesthetics, let’s talk about how your countertop will survive your actual life.
12. Prioritize Scratch and Stain Resistance Based on Your Lifestyle
This is the point where we get brutally honest. Do you live a life of serene order, or is your kitchen a whirlwind of joyful chaos? If your daily reality involves children doing science experiments with food colouring, a partner who treats red wine with abandon, and your own creative-but-messy cooking, then choosing a delicate, porous marble is an act of masochism. You will spend your days policing spills and weeping over etch marks from a stray slice of lemon.

Don’t listen to anyone who tells you that you can “just be careful.” Life is too short. Be realistic about your habits and choose a material that serves your lifestyle, not one that you have to serve. For most busy households, a high-quality quartz or a densely-sealed granite offers the best peace of mind. The shortcut is to test samples. Get a piece of your top contender and abuse it. Spill coffee on it. Leave a wine ring. See what happens. It’s a far better test than any showroom sales pitch.
Now that we have the look and material sorted, let’s make this island work even harder for you.
Maximizing Functionality & Smart Features
A modern kitchen island should be more than just a pretty face. With a bit of clever planning, it can become the command centre of your home, hiding all the ghastly clutter of contemporary life while looking effortlessly chic.
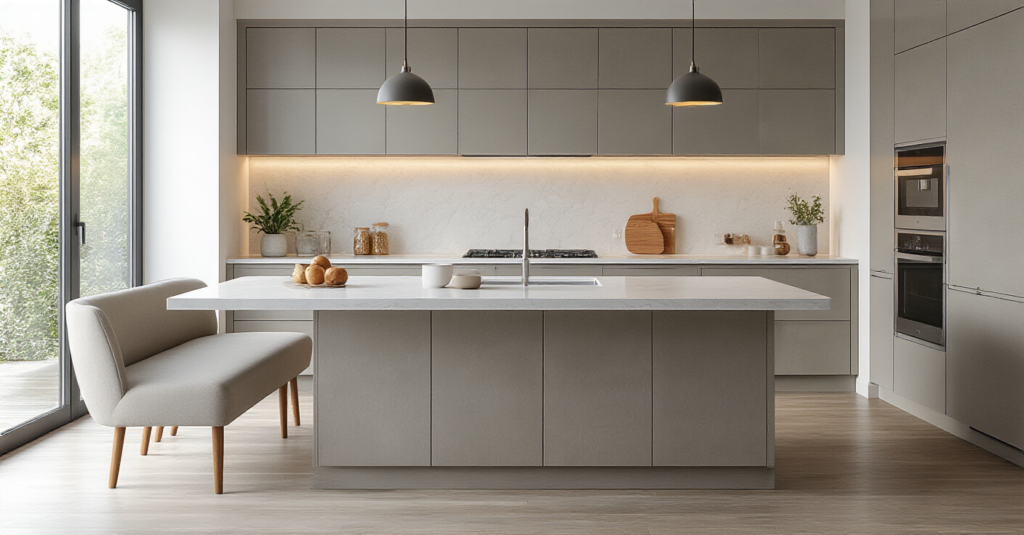
13. Integrate Sinks or Cooktops Seamlessly for High-Function Islands
Placing a sink or a cooktop in the island is a powerful move that fundamentally changes your kitchen’s dynamic. It can turn you from a chef facing a wall to the host at the centre of the party, chopping and chatting simultaneously. A small prep sink can be a game-changer, creating a second work zone that prevents traffic jams around the main sink. I’m a huge fan.
However, a full cooktop in the island requires serious thought about ventilation. A massive overhead hood can spoil the open feel, so you’ll need to investigate sleek downdraft systems that rise up from the countertop like something out of a James Bond film. And as I mentioned, putting your main sink in the island means your drying rack and dirty pans are always on display. What truly matters is ensuring there’s ample landing space—at least 18-24 inches—on either side of any integrated appliance for safety and practicality.
To power these modern wonders, you’ll need electricity.
14. Incorporate Pop-Up Outlets and Charging Stations for Modern Convenience
In this day and age, a kitchen without accessible power is practically medieval. But trailing charging cables and clunky power strips draped across your beautiful new countertop? An aesthetic nightmare. This is where pop-up outlets are a stroke of genius. They hide away, flush with the countertop, and appear with a simple press when needed. It’s clean, it’s clever, and it keeps the visual clutter to an absolute minimum.

The mistake is treating this as an afterthought. It needs to be planned from the beginning, with wiring run inside the island cabinetry. My shortcut is to always opt for a unit that includes not just standard plugs but also USB-A and, crucially, the faster USB-C ports. This future-proofs your island for the next generation of gadgets. Placing one near a seating area turns your island into the most popular spot in the house for homework or catching up on emails.
For even more versatility, consider adding another dimension.
15. Design a Multi-Level or Two-Tier Island Countertop for Varied Use
A two-tier island is a wonderfully clever solution, particularly for open-plan spaces. The lower, counter-height level (36 inches) serves as the primary workspace. The upper, bar-height level (42 inches) acts as a serving bar or casual dining spot. The brilliant part is that the raised tier artfully conceals the clutter and chaos of the prep zone from the view of guests seated at the bar. It’s a very civilised way to entertain.

This design also adds lovely architectural interest, allowing you to play with contrasting materials—perhaps durable quartz for the work surface and a warm butcher block for the dining tier. I once designed one for a family where the lower level was the kids’ dedicated homework and craft zone, keeping glitter and glue contained, while the parents enjoyed the upper level. What’s important is ensuring both levels are still functional and that the structure is properly supported.
And to properly showcase all this clever design, we need light.
16. Plan Under-Countertop Lighting to Enhance Ambiance and Task Visibility
Under-countertop lighting is one of the most transformative, yet often overlooked, design details. It’s a secret weapon. During the day, it’s invisible. But in the evening, with the main overhead lights turned down, it casts a soft, atmospheric glow that makes the island appear to float. It highlights the beauty of the stone’s veining or the texture of the wood and creates an instant mood.

It’s not just for aesthetics, either. The light spilling out from under the overhang illuminates the floor, acting as a subtle safety light at night. The key is to use warm, dimmable LED strips. I insist on dimmers for every lighting source in a kitchen. It allows you to transition the room’s feel from a bright, functional workspace to an intimate, inviting spot for a late-night chat. It’s a small investment for a massive impact.
With your island perfectly designed and installed, we must now ensure it stays that way.
Long-Term Care & Longevity
Your island countertop is an investment. And like any good investment—be it a Savile Row suit or a vintage watch—it requires a bit of care to keep it looking its best. This isn’t drudgery; it’s a simple set of rituals that protect its beauty for years to come.
17. Establish a Daily Cleaning Routine Specific to Your Countertop Material
Please, I implore you, put away the all-purpose spray cleaner. Using the wrong chemicals is the fastest way to ruin a beautiful surface. The most common mistake I see is people using acidic or abrasive cleaners on natural stone, which can strip the sealant and etch the surface over time. It’s a slow-motion disaster.

The only thing that matters is using the right cleaner for your specific material. For quartz and other engineered stones, a simple solution of mild dish soap and warm water is usually all you need. For granite or marble, you must use a pH-neutral cleaner specifically formulated for stone. The shortcut is the “wipe as you go” method. A quick wipe after use prevents spills from sitting and causing trouble. Then, dry it with a soft microfibre cloth. This two-minute daily ritual is the secret to a perpetually pristine countertop.
For natural stone, there’s one more essential step.
18. Understand When and How to Seal Natural Stone Countertops Effectively
If you have a natural stone like granite or marble, think of its sealer as its raincoat. Over time, that coat wears thin and needs replacing. Everyone asks how often to seal, but the answer isn’t a date on a calendar; it’s a simple test. Drip a small puddle of water onto your counter. If it beads up like rain on a newly waxed car, your seal is fine. If the water soaks in and darkens the stone after a few minutes, it’s time to re-seal.

The process itself is not complicated, but you must be meticulous. Clean the counter thoroughly, let it dry completely, and then apply a thin, even coat of a high-quality impregnating sealer. The crucial step everyone gets wrong is failing to wipe off all the excess sealer after it’s had time to penetrate. Leaving it to dry on the surface will result in a sticky, hazy mess that is a nightmare to remove. Follow the instructions to the letter.
And for those inevitable little accidents?
19. Learn Basic Repair Techniques for Minor Scratches and Chips
A day will come when a dropped pan or a heavy mug causes a tiny chip in your beautiful countertop. The natural reaction is to panic. Don’t. Most minor chips and scratches are surprisingly easy to fix yourself with a good quality repair kit specific to your material. It’s a skill worth learning, and it will save you a small fortune in professional repair bills.

I learned this the hard way after paying a man a ridiculous sum to fix a chip no bigger than a lentil. Now, I know better. The kits come with colour-matched epoxy or acrylic fillers and clear instructions. The secret is patience and a light touch. Build up the filler in thin layers for deeper chips, and carefully scrape away any excess before polishing. Mastering this little bit of DIY is empowering and will keep your island looking flawless for years.
Conclusion
So there you have it. The journey to the perfect island countertop is less about chasing trends and more about thoughtful, honest planning. It’s a delicate balance of form and function, of personal style and the practical demands of daily life. It’s about creating a centrepiece that not only looks stunning but also works in beautiful harmony with the rhythm of your home.
Your island is destined to be the backdrop for so much of your life—from quiet morning coffees and chaotic family breakfasts to celebratory toasts with friends. It’s more than a surface; it’s the heart of the home. By embracing these truths, you’re not just designing a kitchen; you’re crafting a space for living. Now, go on, your dream kitchen awaits. And do send pictures when you’re done.