Standing in a kitchen that feels tired: the cabinets yellowing, the backsplash from a decade ago, the lighting that turns everyone vaguely green — can feel paralyzing. A full renovation seems like the only answer, and a full renovation seems impossibly far away. I used to feel that way too, until I started paying attention to what actually changes a room. Not the overhaul. The layers. The choices made carefully, one at a time, with attention to craft and material and the kind of beauty that comes from things made by hand.
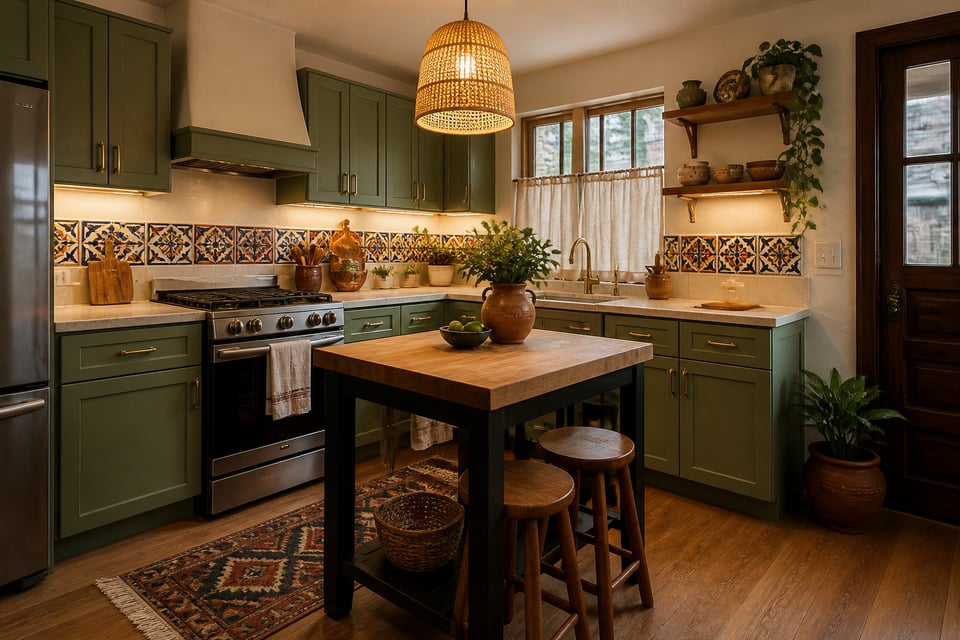
That is the heart of everything I believe about kitchen renovation on a budget: it is not about spending less. It is about spending with intention. Across Latin America, the most extraordinary kitchens I have encountered were not expensive ones. They were kitchens where someone had painted a wall in a colour that told a story, hung a hand-painted plate above the window, or laid a row of Talavera tile behind the stove like a quiet act of pride. This list brings those instincts into your kitchen — sixteen ideas that cost a fraction of a full renovation but communicate something far more lasting than money.
1. Paint Your Cabinets for a High-Impact Kitchen Renovation on a Budget
Nothing rearranges a kitchen’s personality faster than painted cabinets. Not new tile, not new appliances — cabinets, because they cover the most visual square footage in the room and the eye goes to them first, always. Painting them instead of replacing them saves anywhere from $3,000 to $15,000 depending on your kitchen’s size, and a minor kitchen renovation of this kind returns up to 113% nationally. These are not small numbers.
The paint itself matters enormously. Do not reach for chalk paint without a hard wax topcoat. It looks beautiful in the tin and chips within weeks on a cabinet door. Waterborne alkyd formulas are what professionals use: Benjamin Moore Advance and Sherwin-Williams Emerald Urethane Trim Enamel both self-level so brush marks disappear, cure hard like oil paint, and clean up with water. For surfaces already painted or with a laminate finish, Benjamin Moore Stix Waterborne Bonding Primer is widely recommended — skip it and you will find paint peeling at the hinges within months.
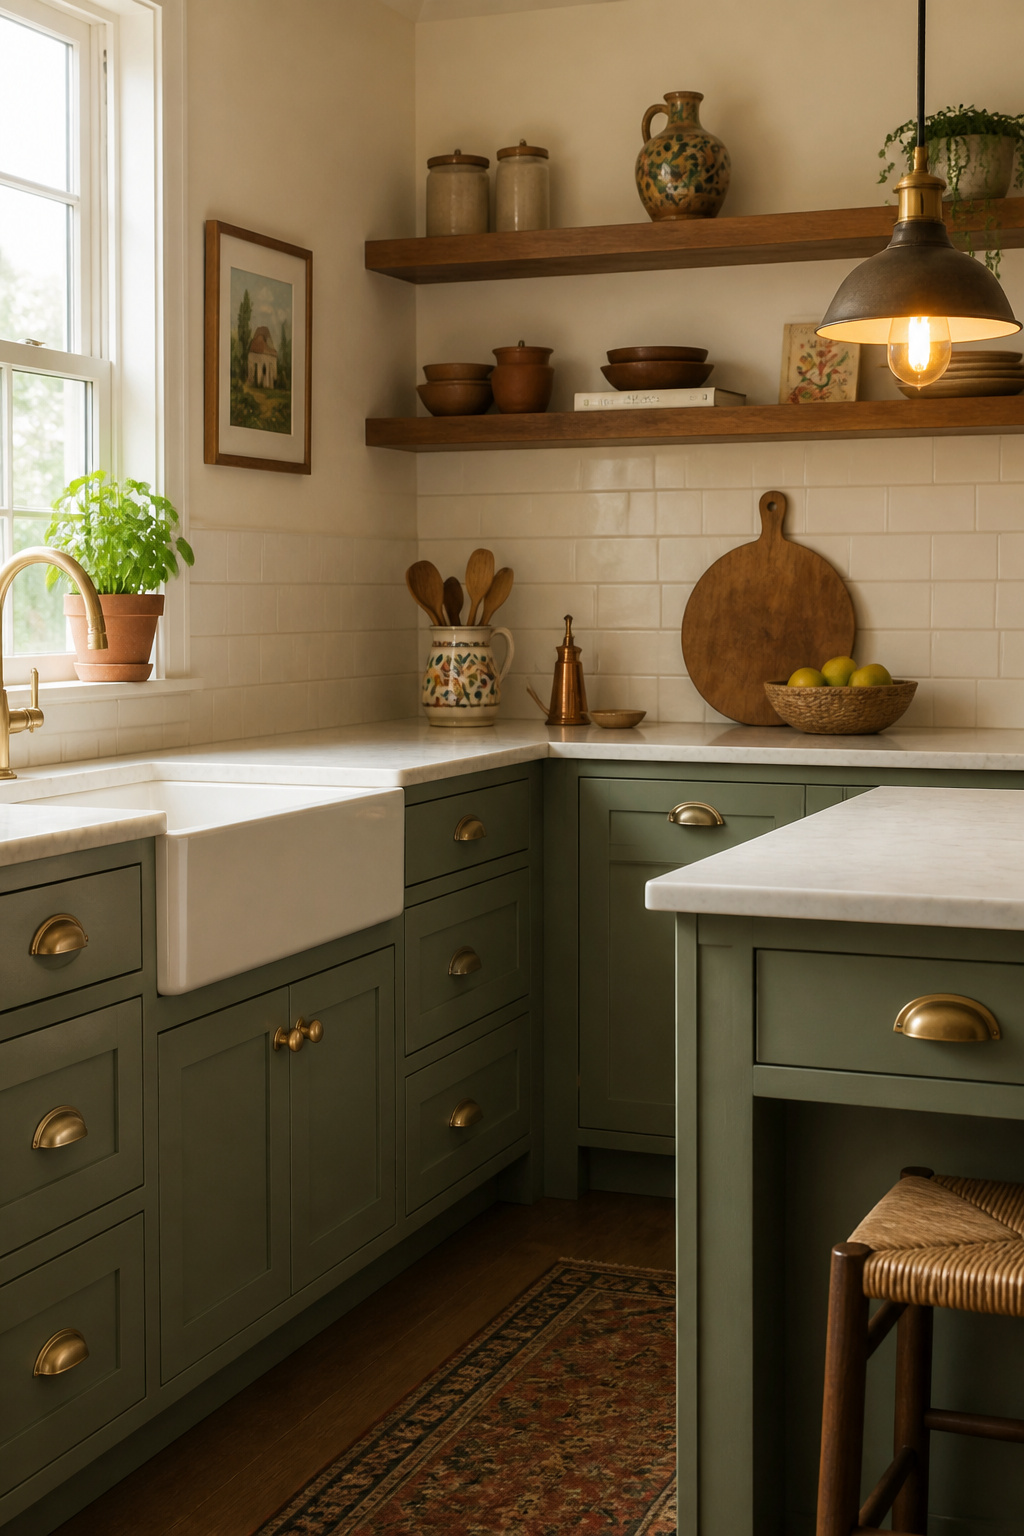
The colour is where the real decision lives. Crisp whites remain the most versatile choice for resale, but deep greens (sage, forest, eucalyptus) are the standout move for 2026, particularly paired with warm brass or antique bronze hardware. If your aesthetic leans toward the Latin-artisan or Mediterranean, consider warm terracotta and clay tones on the lower cabinets with natural open shelving above. Two-tone cabinets let you use colour with confidence without committing the entire kitchen. One caution: give the paint two to three weeks to fully cure before reinstalling the doors. The number one DIY failure is rushing this step. For more budget-conscious approaches to transforming a kitchen without full renovation, these kitchen makeover ideas are worth exploring before you start.
2. Swap Cabinet Hardware to Elevate Every Door and Drawer Instantly
Hardware is the jewellery of a kitchen. Swap it, and the whole room reads differently, and yet it remains one of the least expensive updates in any kitchen renovation on a budget, typically costing $100 to $300 in materials for a full kitchen and taking under two hours to install. No paint, no tools beyond a screwdriver, no dust.
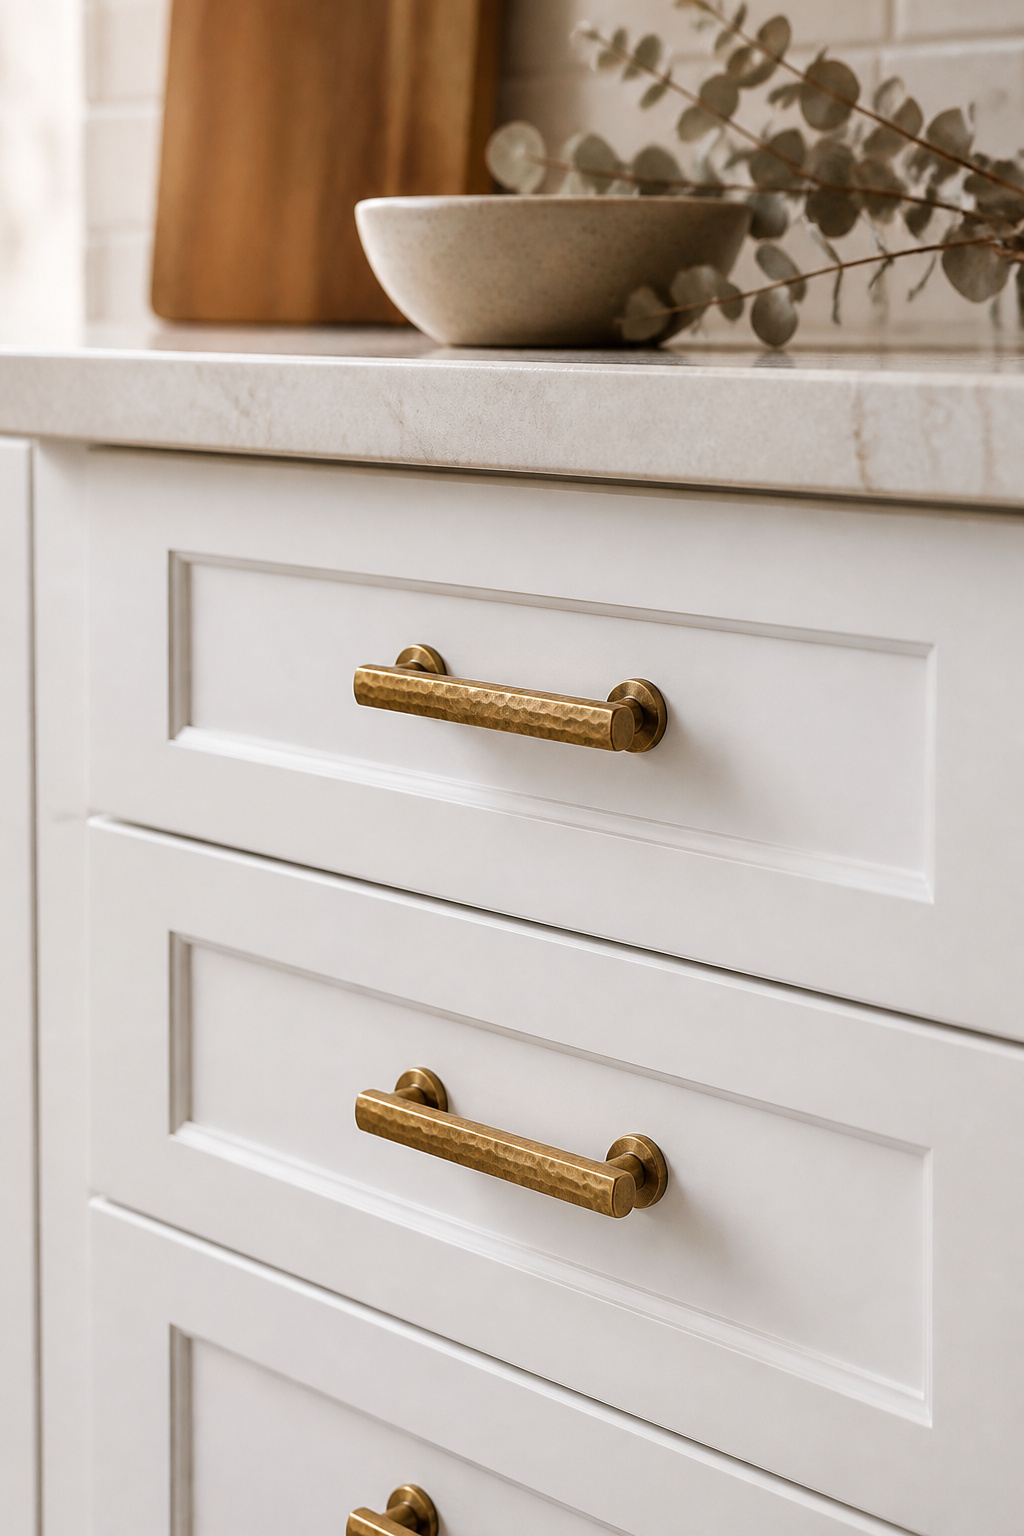
The 2026 moment belongs to warm metals. Bronze is the standout choice this year, bridging classic Shaker-style joinery and cleaner contemporary cabinetry without looking forced. Unlacquered brass develops a genuine patina over months of use, which means your kitchen gets more interesting over time rather than less. Mixed metals are having their moment too: brass pulls on upper cabinets, matte black knobs on the lowers, anchored by a rough 60/30/10 ratio so the variation reads as curated rather than accidental.
For an artisan feel without artisan prices, Etsy is the starting point. Independent makers offer hand-hammered brass pulls and hand-painted ceramic knobs in the $4 to $15 per piece range, and because each one is slightly different, your kitchen immediately takes on that collected, lived-in quality that no showroom can replicate. World Market and Anthropologie carry similar options in the $8 to $20 range. One practical note before you order: measure your existing hardware’s centre-to-centre distance before purchasing bar pulls. The standard is 3 inches, but older cabinetry often differs, and a mismatched order is a painful mistake. This kind of detail (small in cost, high in visual return) is precisely what a budget kitchen update does best.
3. Install a DIY Tile Backsplash That Looks Like a Professional Job
The backsplash is the first thing real estate photographers frame in a kitchen shot. It signals renovation investment even when nothing else has changed, which is why it ranks among the best places to put your budget renovation effort. A standard kitchen backsplash covers 30 to 40 square feet between the counter and the upper cabinets: an affordable canvas for a bold material choice.
Basic ceramic subway tile starts at $1.20 to $3 per square foot. Patterned options — herringbone, Zellige-inspired, handmade-look — run $3 to $10 per square foot. For DIY installation using a basic horizontal pattern, you reduce labour cost by 50 to 70 percent compared to professional installation. The tools required: a notched trowel, a scoring tool or tile saw, a grout float, spacers, and a level — roughly $50 to $80 if buying for the first time. Adhesive mastic works for the dry areas of a backsplash; use thinset mortar anywhere near the stove where heat is a factor.
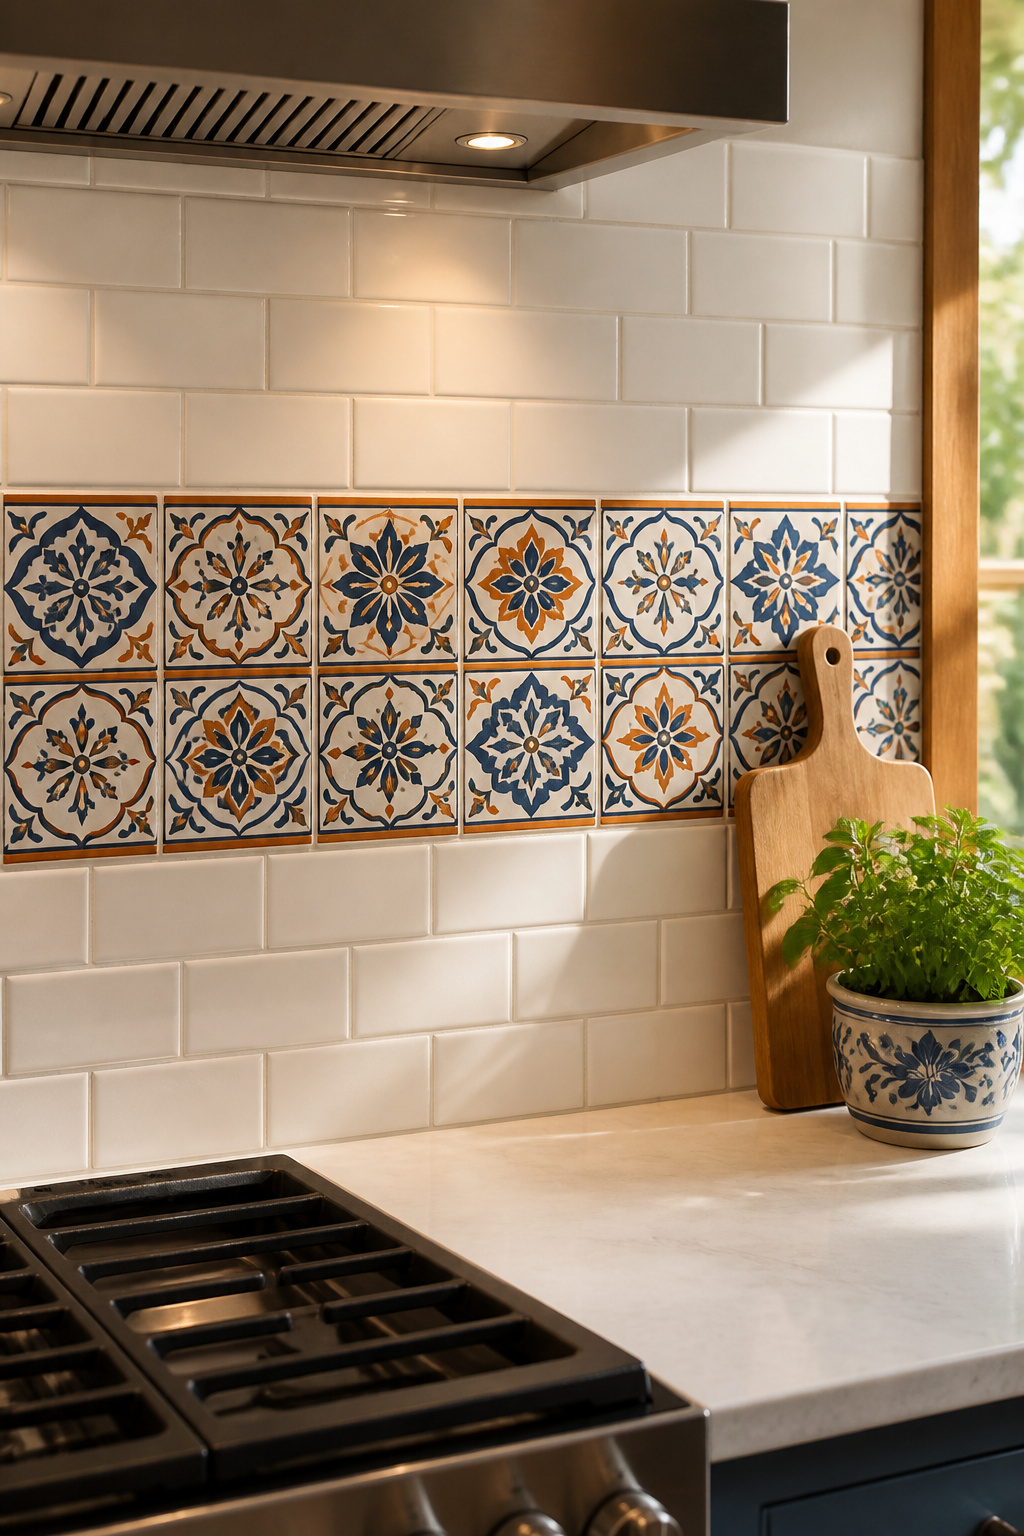
The Talavera Accent Approach
For something genuinely beautiful, consider using authentic Talavera tiles as an accent rather than full coverage. These hand-painted, kiln-fired ceramics come from Dolores Hidalgo, Mexico, where artisans have been making them for centuries. Each tile is subtly unique, and a single row used as an accent strip between neutral white field tiles transforms the kitchen without requiring a large quantity. Rustica House and Mexican Tile Store both import genuine Talavera; Zellige-inspired alternatives are available from Wayfair and BuildDirect at $3 to $8 per tile. Seal the grout within 72 hours of installation. Unsealed grout in a kitchen absorbs cooking grease and stains within weeks, and it is the one step most DIYers skip. For additional tile direction, these modern kitchen backsplash ideas show what is possible across styles and budgets.
4. Budget Kitchen Renovation: Replace Light Fixtures for Instant Drama
A builder-grade flush mount from 2005 communicates contractor-spec no matter what else you have done to a kitchen. Light fixtures are the most underestimated update in a budget renovation. They change the perceived height, warmth, and quality of a space, and interior designers cite them as the most-updated element in before/after kitchen transformations.
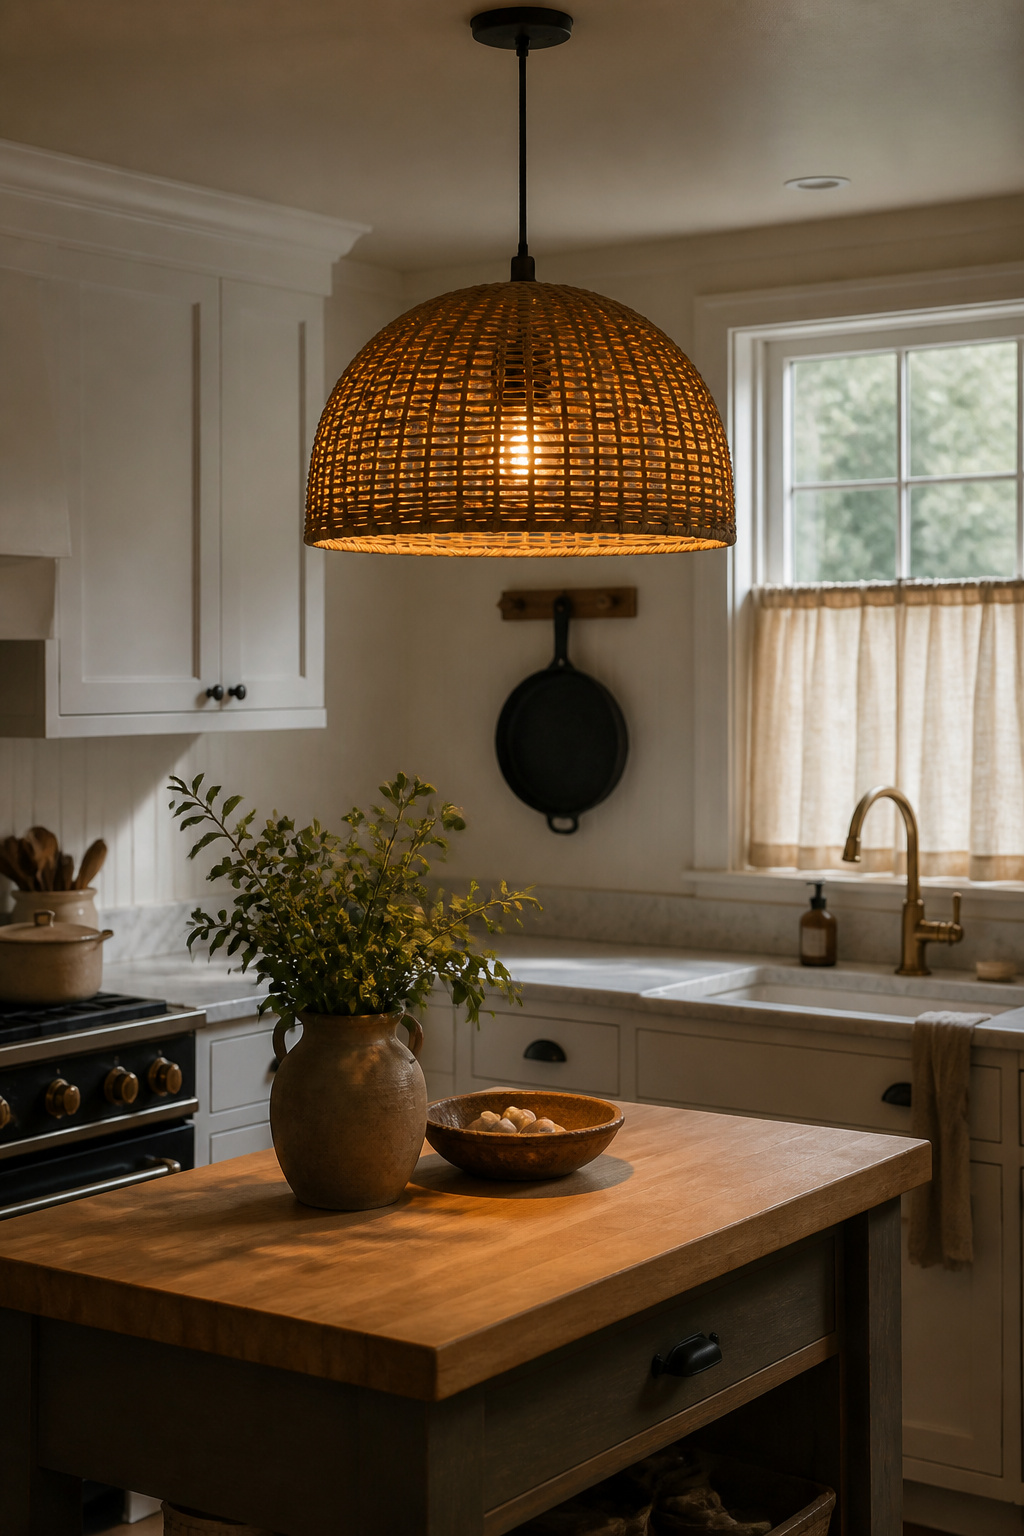
Budget pendant lights start at $25 to $80 on Amazon, IKEA, and Wayfair, far below the $200 to $500 design-house options. The sweet spot for kitchen lighting is warm white — 2700K to 3000K, which makes wood, stone, and brass look richer and more expensive. Cool white (5000K and above) makes everything look clinical. For over-island positioning, hang pendants 30 to 36 inches above the counter surface, centred on the island, with 24 to 36 inches between each pendant if using multiples.
For renters or those not ready to call an electrician, plug-in pendant lights are genuinely well-made now. They hang like standard pendants but plug into a nearby outlet, with prices from $35 to $150. The biggest 2026 development for budget renovators is the dual-power hybrid fixture: designed to plug in today and be hardwired into the same junction box later when you are ready for a fuller renovation. One swap that costs almost nothing and takes under an hour: changing the light bulbs in existing fixtures from cool white to warm white. It will not transform the fixture, but it will transform how the kitchen feels in the evening. For dining and table lighting ideas that work alongside a kitchen renovation on a budget, these kitchen lighting ideas over the table offer useful reference.
5. Peel-and-Stick Wallpaper to Add Bold Kitchen Personality Without Permits
Removable wallpaper has changed. What was once a rental hack with a tendency to peel at the corners has become a genuinely durable product that professional designers specify in client kitchens. Modern peel-and-stick options from brands like Tempaper, Chasing Paper, and STCERY use air-release adhesive (which prevents bubbling) and vinyl or vinyl-coated surfaces that are moisture-resistant, scrubbable, and stain-proof.

A 60 square foot kitchen accent wall costs $60 to $150 in removable wallpaper, about the same as a can of paint but with far more pattern and colour variety. Small-scale patterns (small-format tile prints, micro-botanical, geometric repeats) work across a full kitchen wall without overwhelming a compact space. Large-scale patterns are better used as a single focal accent: one wall behind open shelving, or inside glass-fronted cabinet interiors where the pattern is visible only when doors open, a jewellery-box effect that costs under $30 in material.
For the artisan kitchen, warm earthy tones and patterns inspired by traditional tiles or botanical illustration are the most relevant choices. Install always on a painted surface (never bare drywall: the adhesive pulls the paper face clean off when removed). Start from a plumb vertical line, not a wall edge, because kitchens rarely have square corners. Avoid walls with sustained steam exposure directly behind a stove without a range hood, or adjacent to a dishwasher vent. For more kitchen wallpaper ideas at every budget, this collection of ways to wallpaper your kitchen on a budget goes deep into options and installation approaches.
6. Open Shelving: A Budget-Friendly Kitchen Remodel That Feels Elevated
One homeowner documented the following transformation: she removed her upper cabinet doors, installed three floating pine shelves in their place, painted the wall behind them a warm white, and styled the shelves with her everyday dishes and a handful of artisan pieces she already owned. Total cost: $325. The alternative (new upper cabinets) would have been $5,000 minimum. This is the kind of number that reframes what a budget-friendly kitchen remodel can actually achieve.
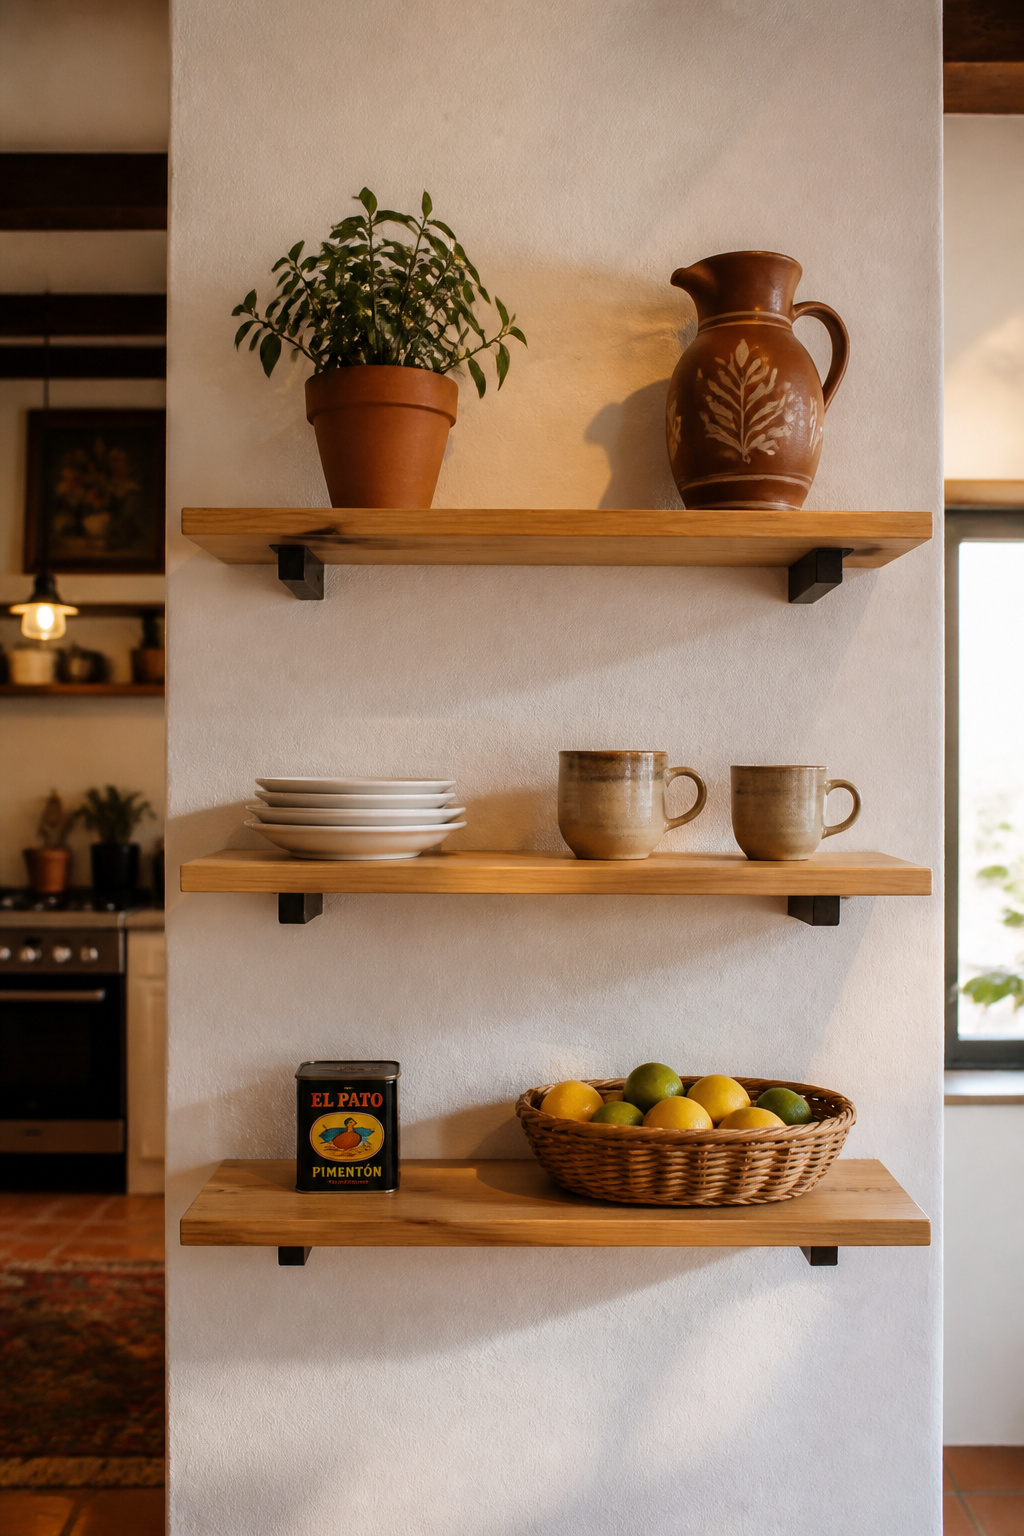
Removing upper cabinet doors is a free first step, and it is fully reversible. Rehang the doors if you hate it — nothing permanent has happened. If you decide to stay with open shelves, floating shelf brackets from Home Depot, Walmart, or Amazon run $30 to $80 per shelf. Pine edge-glued boards ($15 to $40 per shelf) offer a butcher-block appearance that can be stained or left natural. For a more industrial or farmhouse look, visible black iron L-brackets; for vintage or Latin colonial styles, ornate corbels. Locate screws into wall studs for anything heavier than lightweight ceramics — floating shelf brackets hold approximately 40 to 60 pounds per bracket when properly stud-mounted.
The styling is where this becomes design rather than just DIY. A useful ratio: 60% practical everyday items (dishes, glasses, jars of dried goods), 30% decorative (a hand-painted Mexican serving bowl, a ceramic crock, a trailing pothos), 10% deliberate negative space. Shelves should look like someone lives there, not like a magazine art direction. Smart kitchen storage ideas for small spaces can help you think through what you gain and lose with open storage before committing.
7. Refinish Countertops Instead of Replacing Them Entirely
New quartz or granite countertops cost $50 to $200 per square foot installed. A DIY epoxy refinishing kit for the same counter costs $100 to $350, and when done correctly, creates a non-porous, glass-hard surface that feels like real stone and lasts 10 to 30 years with proper care. This is the maths that makes countertop refinishing one of the most compelling moves in an affordable kitchen renovation.
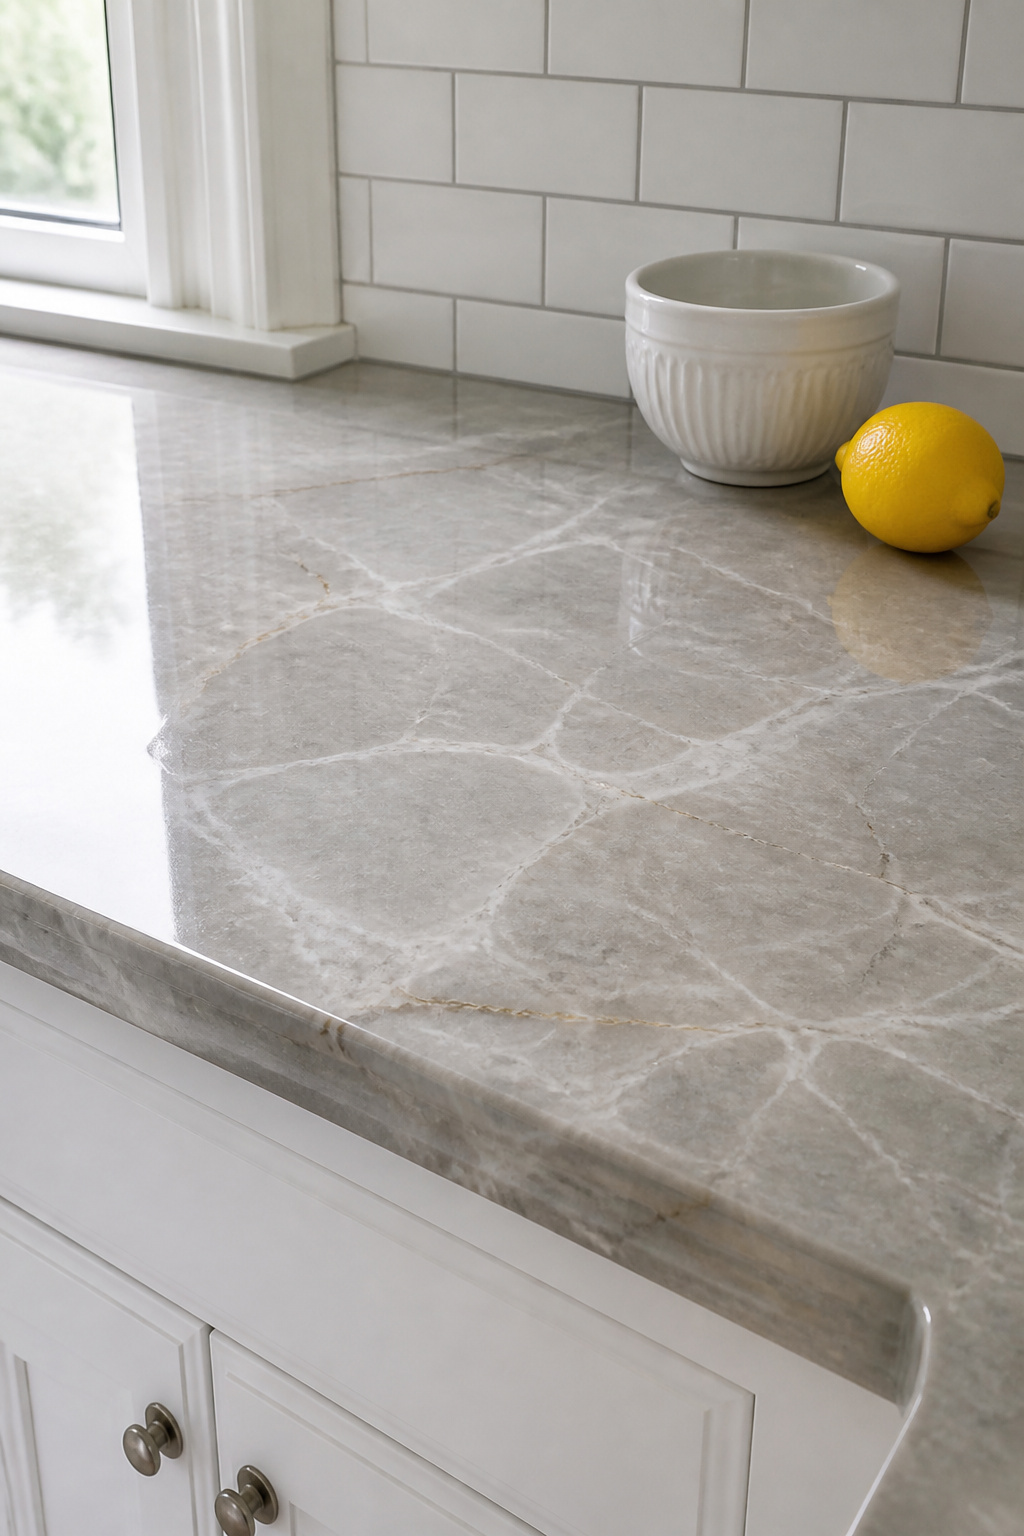
Laminate countertops in good structural condition are the best candidates — epoxy bonds well to sealed laminate, and the transformation can be genuinely dramatic. Avoid refinishing if you have structural damage: warping, delamination at the edges from water intrusion, or significant surface damage that refinishing cannot hide. Brands like Rust-Oleum Countertop Transformations and Countertop Epoxy are the most accessible; expect to pay $10 to $20 per square foot in materials, and clear your schedule for a full weekend since the process involves two to three coats with drying time between each.
The one honest caveat: all epoxy yellows eventually under UV exposure. Quality brands include UV inhibitors that delay yellowing significantly, and for counters away from direct window sun this matters very little. Contact paper ($15 to $60 for a full kitchen) is the most budget-accessible option, with a realistic lifespan of one to three years used carefully; it is the right choice for renters who need to change finishes frequently. For colour selection, bring a cabinet door sample and a flooring chip when choosing your epoxy base coat — colour perception shifts significantly under kitchen lighting, and a mismatch you could not see in the store becomes obvious the moment the product goes down.
8. Create a Kitchen Island From a Repurposed Dresser or Butcher Block Cart
There is something deeply satisfying about a kitchen island that was something else before it was a kitchen island. A solid wood dresser from a thrift store (one with tight drawers, no particle board, and good bones) can become the most characterful piece in a kitchen for under $300 total. Compare that to $400 to $3,000 for a new freestanding island, and the case makes itself. In a kitchen remodel on a budget, the thrift-store dresser strategy is hard to beat for character per dollar.
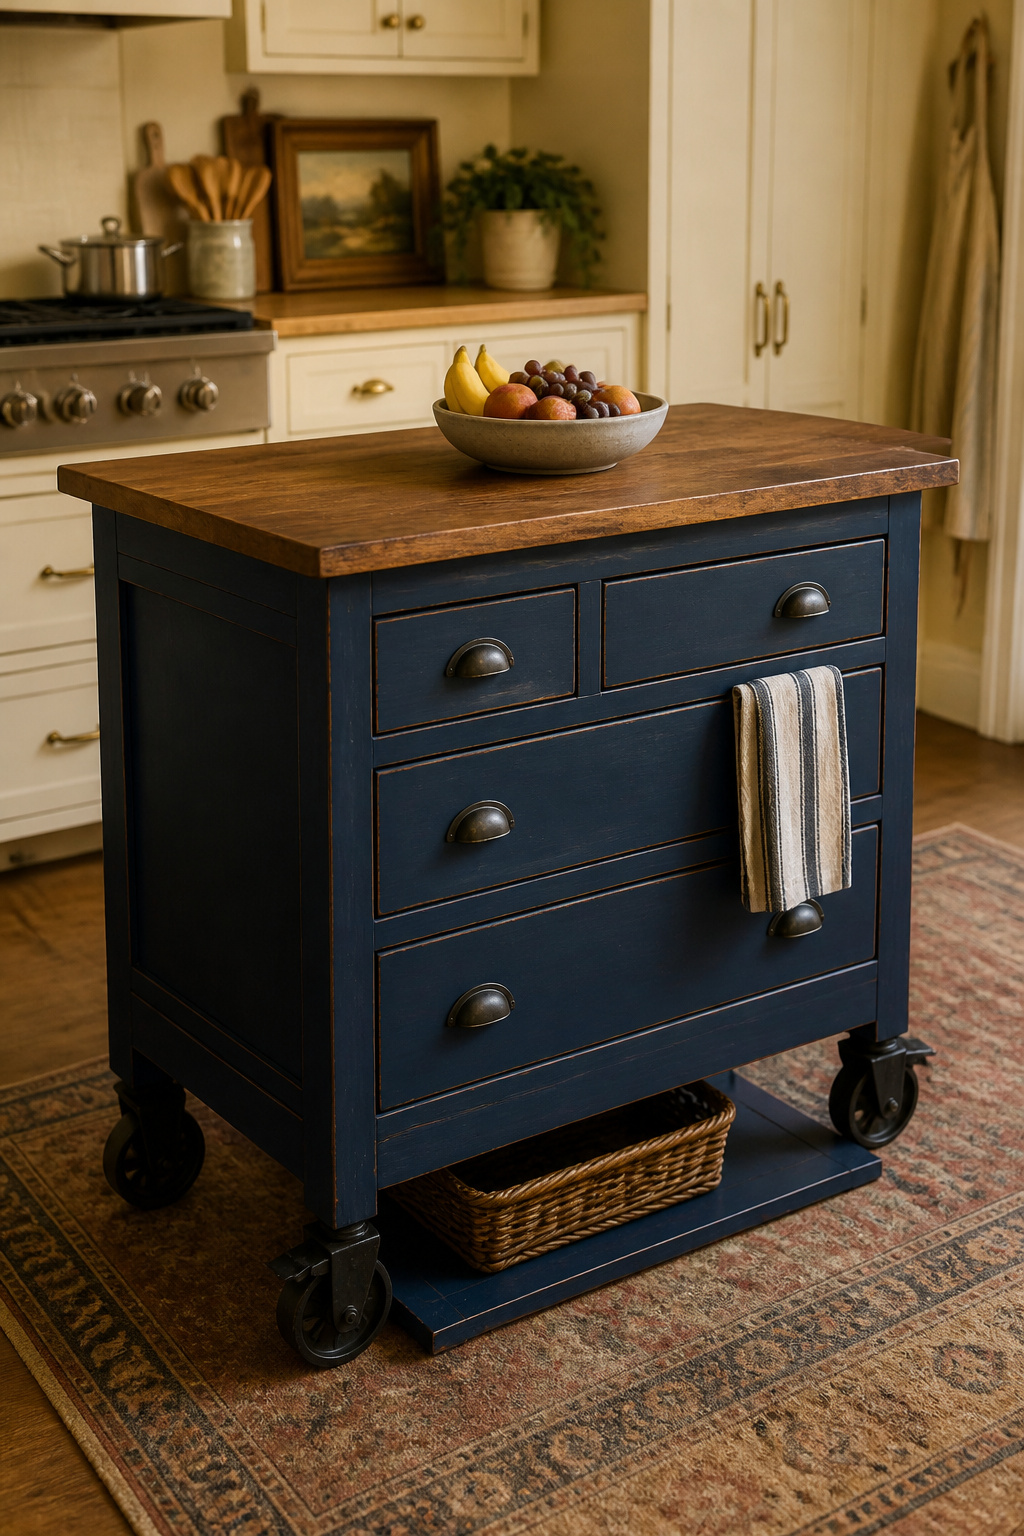
The principal challenge is height. Dressers typically sit at 29 to 30 inches — about 6 inches below standard kitchen counter height of 36 inches. The two fixes: build a simple kick base from 2×6 lumber that lifts the whole piece, or add heavy-duty locking casters rated at 50 pounds or more per wheel (a set of four costs $20 to $40). Casters have the added advantage of mobility. You can push the island out of the way for cleaning or when you need the floor space for another reason.
For the top, edge-glued pine panels from hardware stores ($30 to $60) look remarkably similar to butcher block at a fraction of the price; Home Depot will cut them to size. True butcher block (IKEA’s range and John Boos are the accessible options) runs $80 to $200 in standard widths and requires food-safe mineral oil before first use and monthly after. Do not skip the sealant; unsealed wood in a kitchen absorbs oils and harbours bacteria within days. Paint the dresser a contrasting colour to your existing cabinets: deep navy against white, terracotta against grey. The island reads as a deliberate design choice rather than something you found on the kerb.
9. Use Handcrafted Ceramic Tiles as Affordable Artisan Statement Pieces
You do not need to tile the entire backsplash with Talavera to make it feel like Talavera. The artisan backsplash strategy is simple: use 20 to 40 decorative tiles as an accent within a field of simple neutral tiles, and let the craft carry the whole composition. Total material cost for this approach: under $150 to $200. The visual impact is unmistakable.
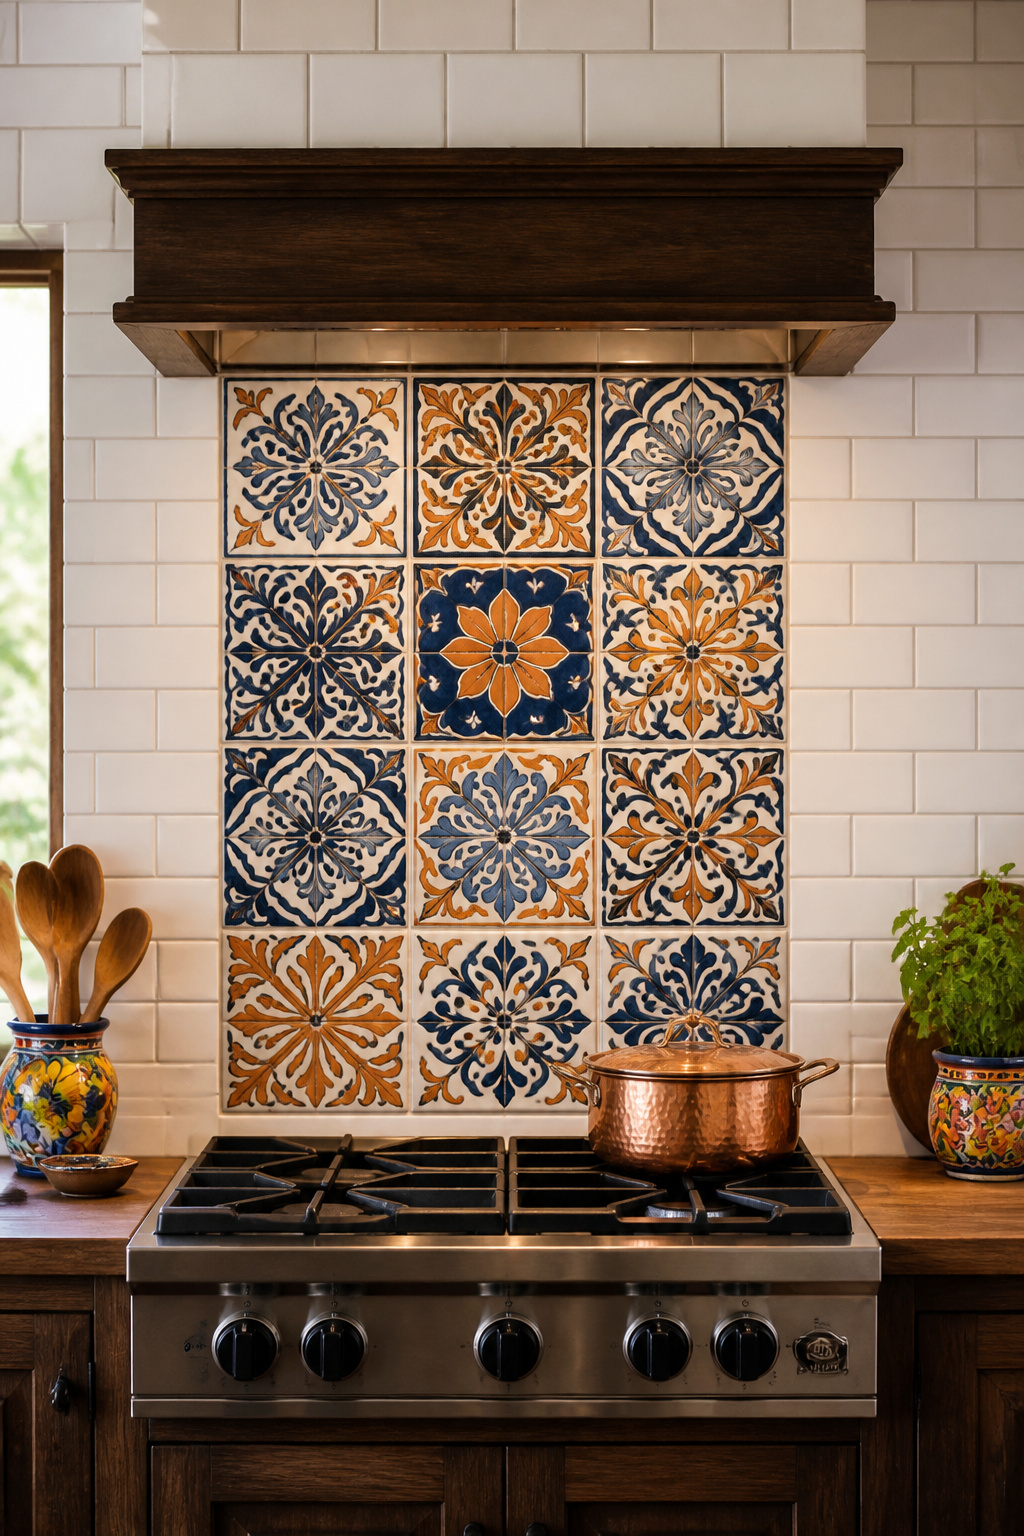
The range hood surround is the highest-visibility accent position in a kitchen. A 10 to 15 tile installation creates a focal point visible from across the room, framing the cooking zone the way an architectural feature would. Alternatively, run a single row of patterned tile as a horizontal strip at eye level across the full width of the backsplash, between rows of neutral subway tile above and below. A niche or inset shelf backed with 6 to 12 decorative tiles creates a miniature gallery moment — small in scale, large in character.
Authentic Talavera from Rustica House and Mexican Tile Store is kiln-fired and hand-painted by artisans in Dolores Hidalgo, Mexico — each tile subtly different from the next, which is exactly what makes them beautiful. La Fuente imports offers bulk sets at accessible pricing. For those who want the look without the import logistics, Zellige-inspired and Portuguese-style tiles from Wayfair and BuildDirect deliver a similar handcrafted aesthetic at $3 to $8 per tile. Pair with plain white or off-white neutral field tiles: the contrast is what makes the artisan pieces sing.
10. Refresh Your Sink Zone With a New Faucet and Simple Styling Updates
A kitchen renovation on a budget begins at the sink zone more often than people expect. The sink is the most-used surface in the room, where meals begin and end, which means it is also the place visitors interact with most often, and the most visible sign of a kitchen that has or has not been cared for. A dated chrome faucet surrounded by sponge detritus and a yellowed soap dispenser communicates neglect even in an otherwise updated room.
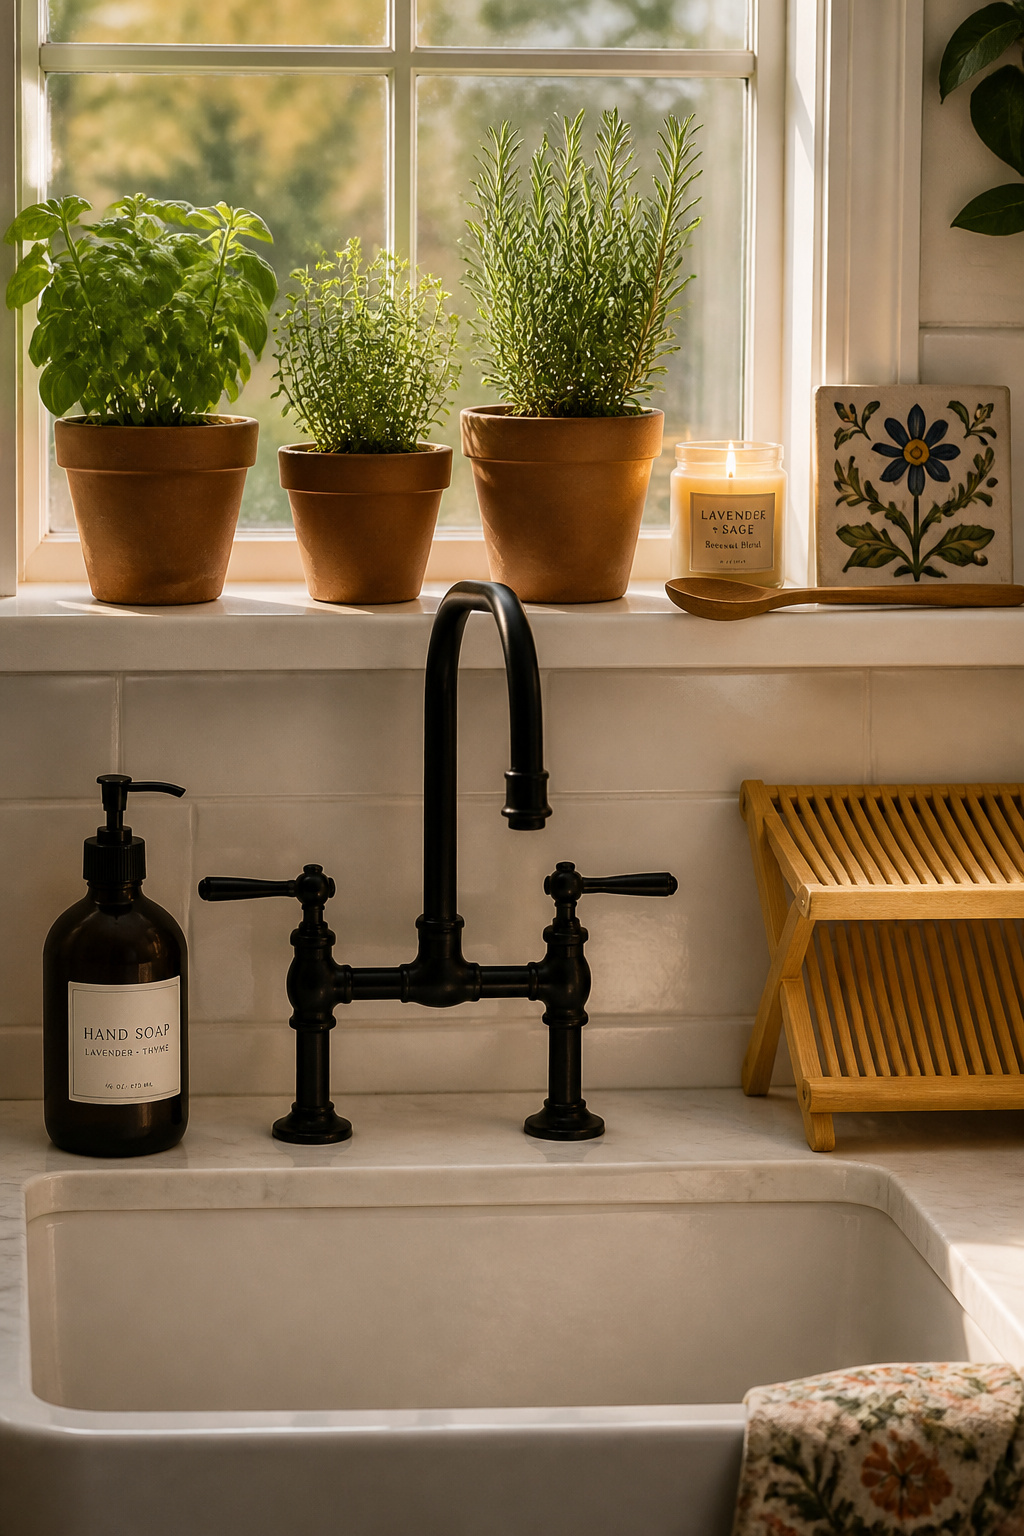
Replacing a kitchen faucet is a straightforward DIY task for anyone comfortable working under a sink. A plumber can complete the same job in 30 to 60 minutes, charging $200 to $500 including parts; DIY costs only the faucet, which ranges from $40 to $250 depending on quality. Budget brands with proven real-world performance include WEWE (around $50, with a 5-year warranty) and FORIOUS (under $40, with strong reliability testing in family kitchen conditions). The tools required: an adjustable basin wrench, plumber’s putty or silicone sealant, a bucket, and a flashlight. Before ordering any faucet, count and measure the existing mounting holes: the standard is 3 inches centre-to-centre, but older kitchens often differ.
Beyond the faucet itself, the sink zone becomes a styling opportunity. A soap dispenser and sponge holder in matching finish creates cohesion for under $30. A sculptural dish rack — bamboo-style, or a simple stainless design — elevates function to decor. A small pothos or herb pot on the windowsill above the sink brings greenery to the most-used part of the kitchen. My personal instinct for the sink zone: a hand-painted ceramic crock for utensils, a beeswax candle on the sill, and a woven placemat under the dish rack. Three objects. Everything reads as intentional.
11. Budget-Friendly Kitchen Remodel: Build a Gallery Wall for Character
A kitchen gallery wall does what no tile or fixture can: it communicates who lives here. Travel, heritage, family, humour, obsessions. It is all available to express in a gallery wall, for a total investment of $30 to $150 in most cases — making it one of the best cheap kitchen makeover ideas available. The kitchen is an underused location for this kind of display; it is actually one of the best spots because the wall time is high. People linger here, waiting for water to boil, washing up after dinner, making coffee.
Start with a mix of sources rather than buying everything from one place. Art prints from Etsy (digital downloads, printed at home at a copy shop) cost $2 to $15 each and can achieve a polished look with simple IKEA frames. Thrift stores are the right source for vintage plates — $0.50 to $5 each, with wall plate hangers available for $1 to $3 per plate. From your own collection: a hand-painted piece from a market, a postcard in a simple frame, a recipe card in your grandmother’s handwriting. Mix at least two frame finishes (wood plus metal, or black plus natural), three frame sizes, and include at least one three-dimensional object, a small ceramic, a wooden utensil, a miniature woven basket — to add texture among the flat pieces.
Layout and Placement
Before committing to nails, trace each frame onto kraft paper and tape the templates to the wall with low-tack painter’s tape. Adjust the layout until the proportions feel right, then remove the templates one at a time and nail through each marked point. Avoid positioning art directly above the stove — heat and grease vapour damage both frames and prints over time. Go large: a gallery wall needs to fill at least 60 to 70 percent of its host wall to look intentional. Too small and it looks like you ran out of ideas.
12. Install Under-Cabinet Lighting to Elevate Your Whole Cooking Experience
Of all the budget kitchen upgrades on this list, under-cabinet lighting has the most disproportionate relationship between cost and impact. In fact, plug-in LED strips for a full kitchen run cost $15 to $40, making this one of the highest-return investments in a budget kitchen renovation. They require zero electrical work: just a nearby outlet, a set of adhesive mounting clips, and fifteen minutes.
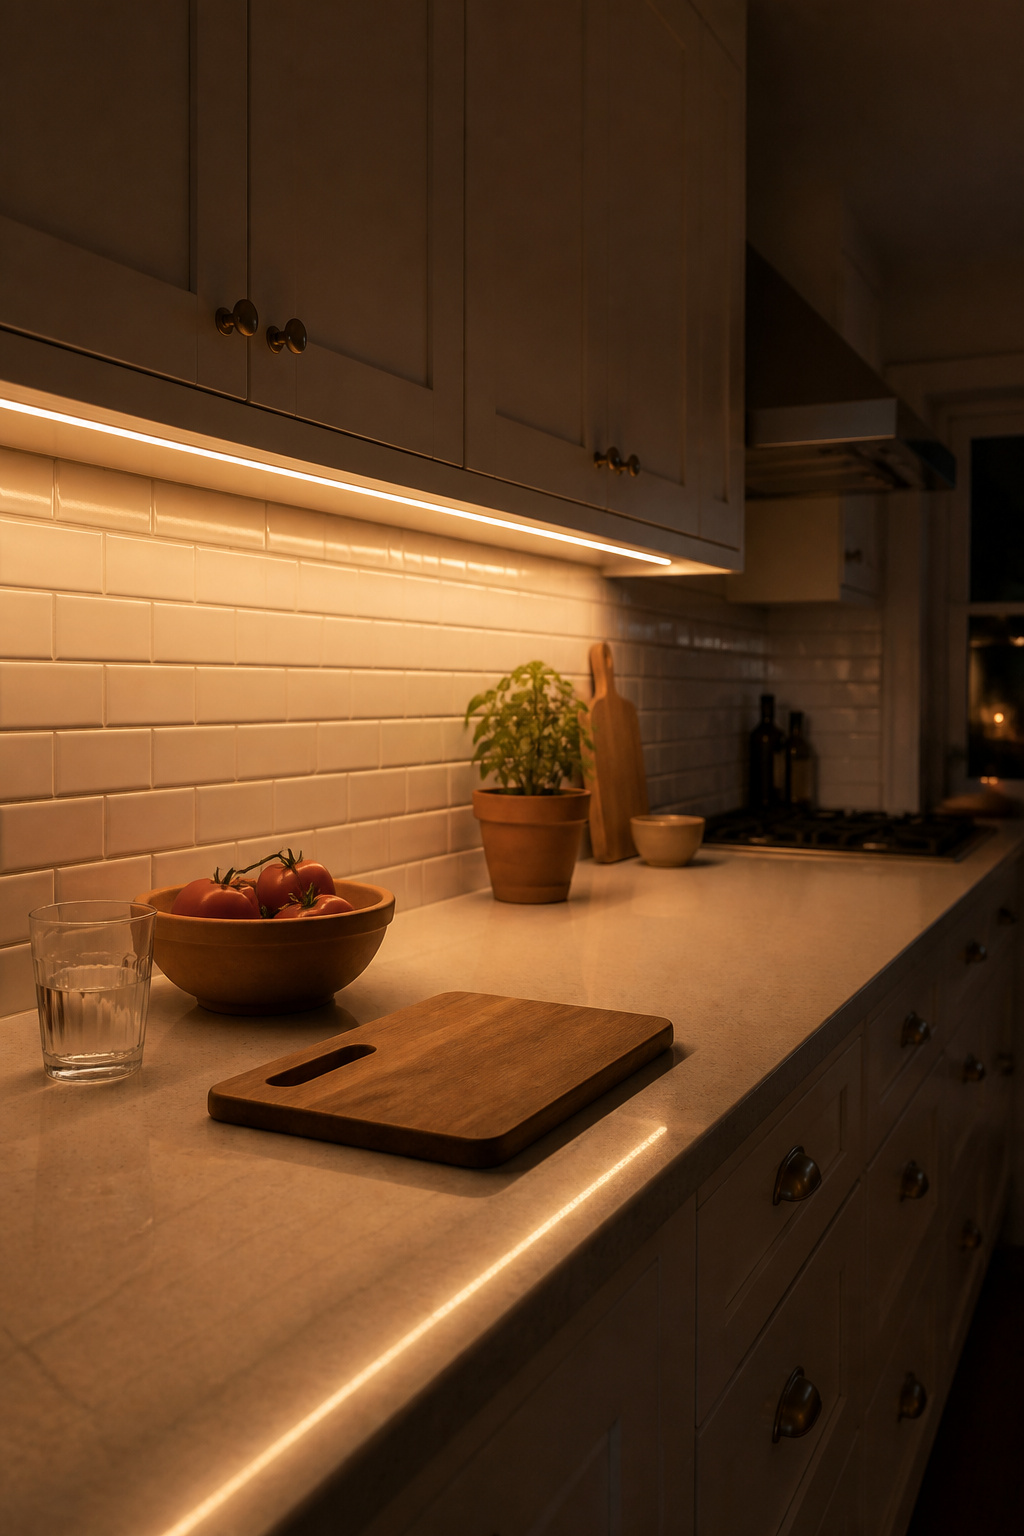
The practical case: under-cabinet lights eliminate the shadow cast by your own body when working at a counter, which makes chopping vegetables in a kitchen with only overhead lighting feel dimmer than it should. The atmospheric case: they add a layer of warm, low light that makes a kitchen feel layered and designed rather than reliant on a single overhead source. Countertop materials you already have (tile, wood, stone) look richer, more textured, and more expensive under warm task lighting.
For colour temperature, 3000K is the sweet spot for a residential kitchen: bright enough for task work, warm enough to feel inviting. Anything above 4000K tends toward the clinical. Dimmable options add $5 to $15 to the cost and allow the same fixture to serve as task lighting during cooking and atmospheric lighting in the evening. Linkable plug-in systems (the LABOREDUCER 24V system is one example) allow multiple strips to connect to a single outlet, creating a clean installation without visible cord runs between sections. If you are in the middle of a larger renovation, budget $150 to $350 to have an electrician hardwire them instead: it creates a completely clean look and removes the last visible cord from the kitchen.
13. Organise With Handmade Baskets, Pottery, and Artisan Storage Finds
Organisation is often treated as separate from design: practical rather than aesthetic, functional rather than beautiful. The artisan approach dissolves this distinction. When everyday storage items are beautiful, the act of putting things away becomes an act of arrangement. The kitchen becomes a place you want to be in.
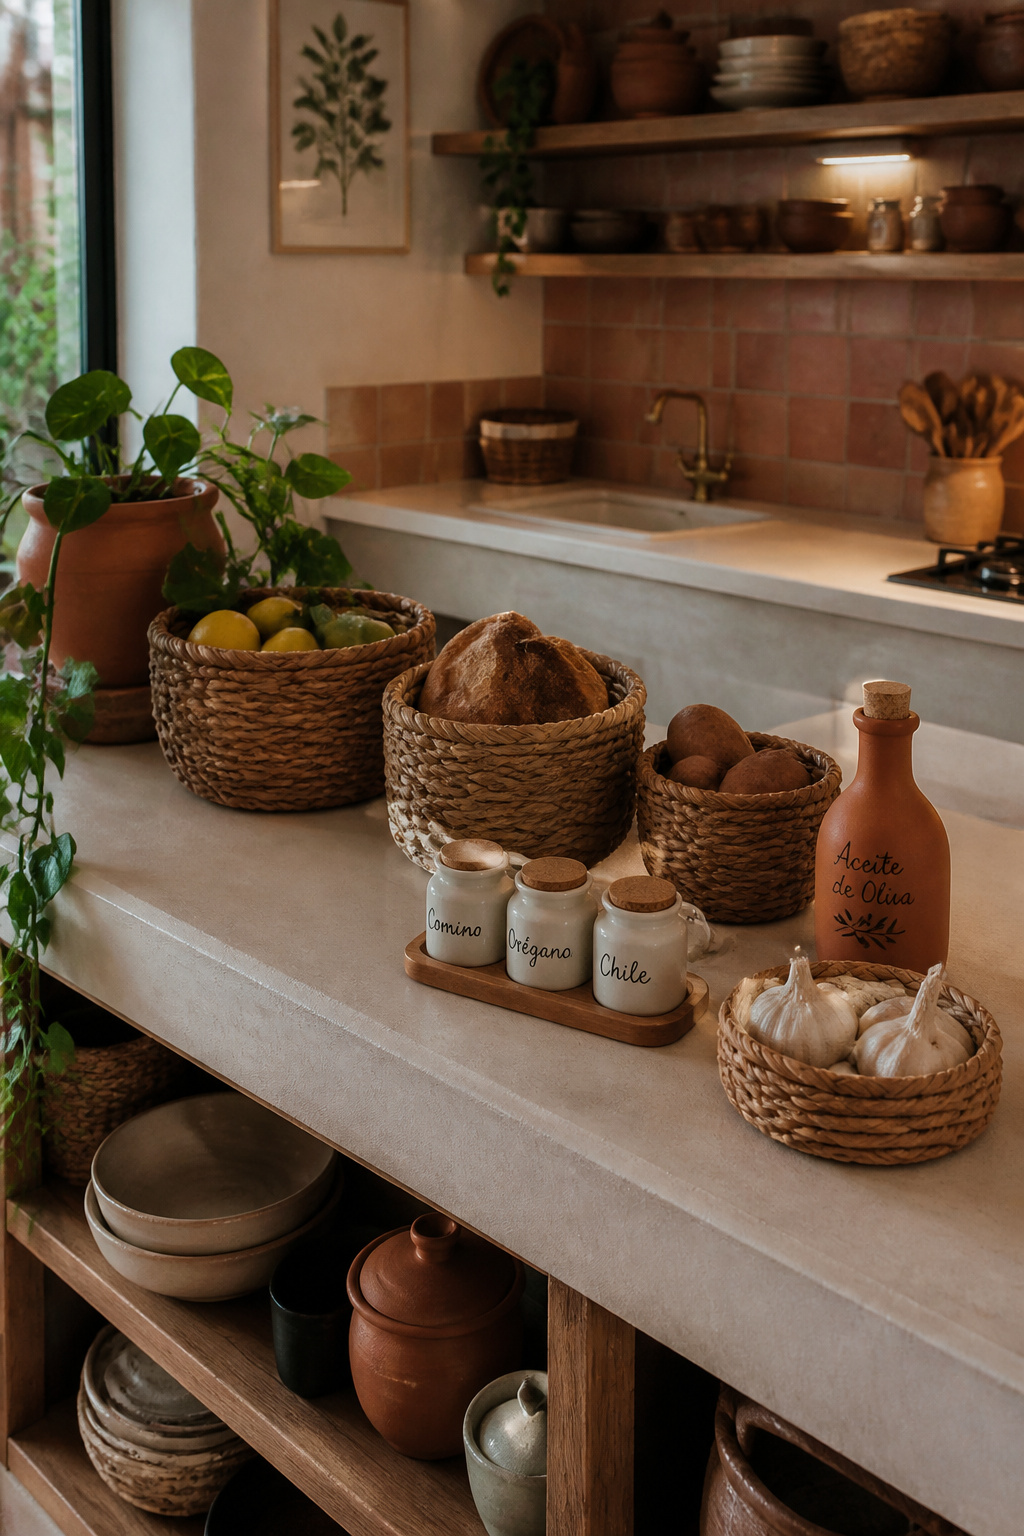
Woven seagrass and rattan baskets from World Market (Cost Plus) range from $10 to $40 and hold fruit, bread, root vegetables, and small pantry items elegantly. Ten Thousand Villages and Novica source fair-trade artisan baskets and ceramics from Latin America, Africa, and Asia — $20 to $80 per piece, genuinely handmade and genuinely better for the people who made them. Etsy independent sellers offer custom ceramic spice jars, hand-painted canisters, and woven bread baskets from individual makers who can accommodate specific sizes or colour requests. Local Mexican or Latin American import shops: the kind that carry everything from Oaxacan rugs to clay cooking pots — often price below what online retailers charge, and shopping there supports community businesses. For a broader view of kitchen storage solutions, these kitchen storage furniture ideas cover pantry systems and built-in options beyond the counter.
Styling the storage: group by function and material so the eye reads organised clusters rather than scattered items. Consistent labelling (hand-lettered ceramic tags, stamped leather labels from a craft store) ties mismatched containers into a coherent system. Leave gaps. Seventy percent capacity on open storage looks curated; one hundred percent looks desperate. And tuck in a sensory element: a sprig of dried lavender, a cinnamon stick, a few dried citrus slices in a basket. A kitchen that smells alive feels alive.
14. Kitchen Remodel on a Budget: Transform the Space With New Window Treatments
The window is the last thing most budget renovators think about, which is why kitchens with builder-grade vinyl mini-blinds persist long after everything else has been updated. The mini-blind communicates “nothing has changed here in fifteen years” more reliably than almost any other detail. Replacing it takes under an hour and costs $30 to $80.
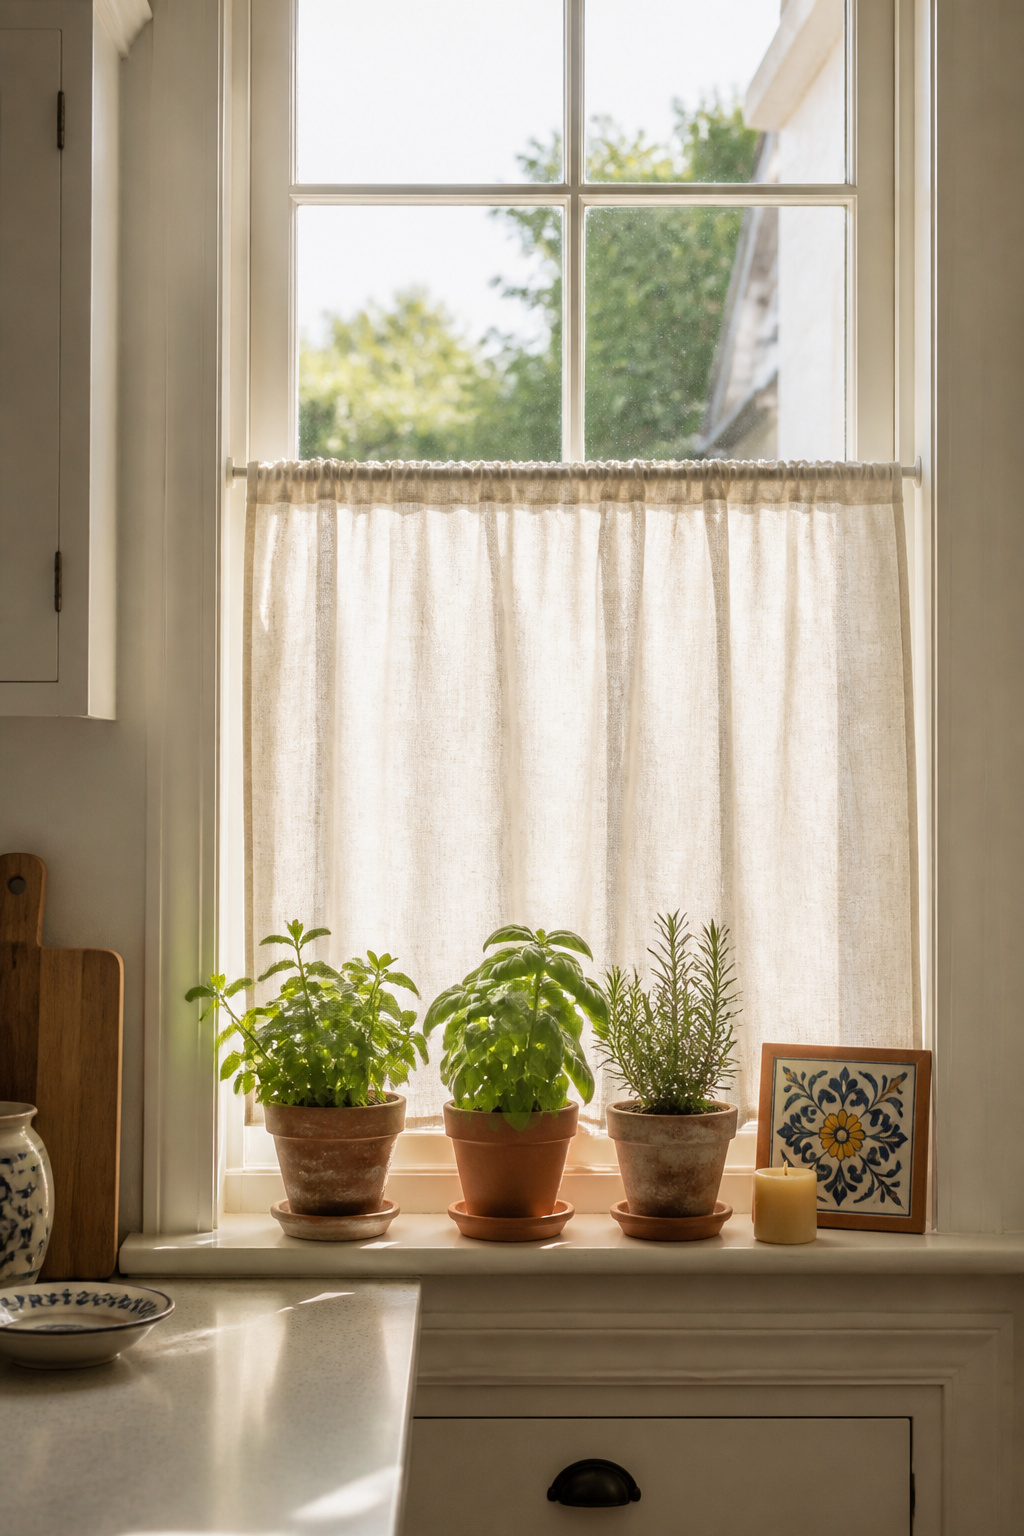
Roman shades in cotton or linen stack neatly when raised and filter light elegantly when lowered — IKEA, Amazon, and Target all carry them in this price range. Café curtains cover only the lower half of the window, allowing light from above while providing privacy below, a solution common in European kitchens and perfectly suited to the Latin-artisan aesthetic where the window ledge becomes a plant and object display. Linen and cotton are the best fabrics for kitchen use: they breathe, hang with natural drape, and go through the washing machine easily. Avoid velvet or silk in cooking environments — steam and grease vapour will ruin both within weeks.
A No-Sew Option
Tab-top curtain panels require almost no sewing. A rectangle of fabric with simple loops at the top, threaded onto a rod — achievable in under an hour using iron-on hem tape with no sewing machine required. Fabric by the yard from IKEA ($3 to $8 per yard) or a fabric market lets you match exactly the colours already in the kitchen. Vintage linen tea towels, repurposed tablecloths, and flour sacks have all been pressed into service as kitchen curtains to beautiful effect. One installation tip that makes a significant difference: hang the curtain rod 4 to 6 inches above the window frame (not at frame height) and extend it 6 to 8 inches beyond the frame on each side. This makes the window appear dramatically larger and the ceiling appear higher, with no kitchen remodel on a budget required.
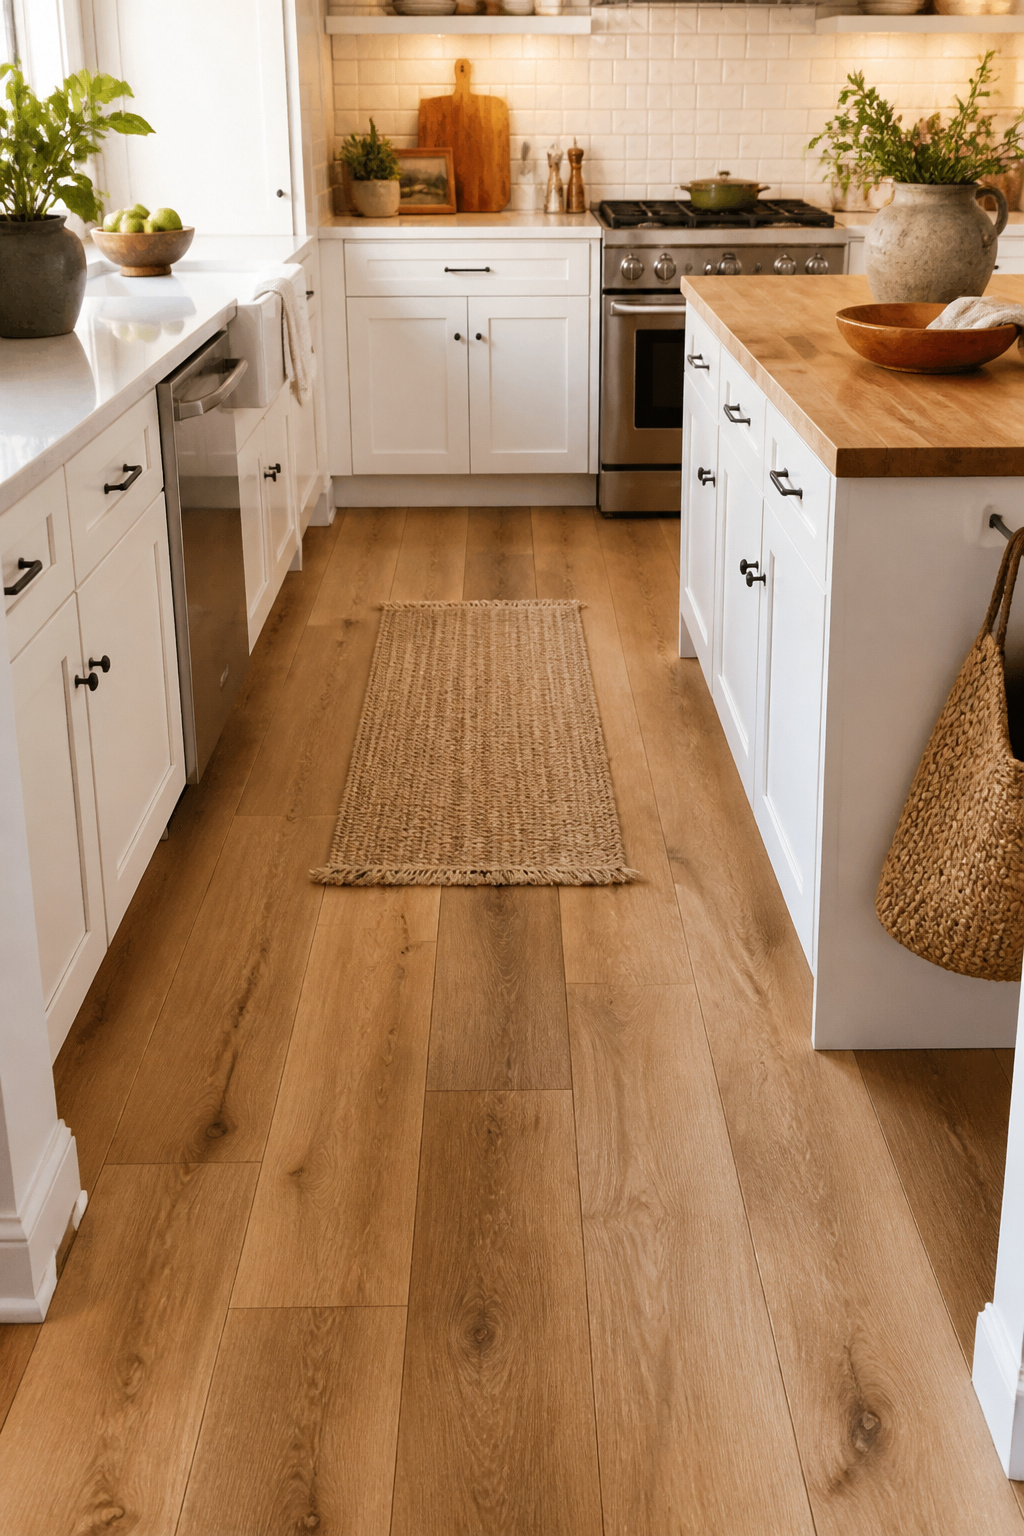
15. Lay Peel-and-Stick Vinyl Planks to Refresh Your Kitchen Floor Affordably
Kitchen flooring renovations are among the most disruptive and expensive updates in a full renovation. Peel-and-stick vinyl plank flooring sidesteps both issues. It costs $0.50 to $2.50 per square foot (compared to $3 to $10 for click-lock luxury vinyl plank, or $8 to $20 for tile with installation). Installation requires no adhesive, no grout, no subfloor preparation beyond thorough cleaning, and can be completed over a weekend.
Durability and Surface Prep
The honest assessment of durability: the vinyl tile itself is waterproof, but the adhesive backing is the vulnerability. Water working under the seams from pooled spills left to sit can lift tiles over time. Two habits in a kitchen renovation on a budget eliminate this risk: tight seam installation (press edges firmly together and against adjacent tiles) and immediate spill cleanup. Install over existing smooth, clean vinyl, hardwood, or tile in good condition; rough or uneven subfloors cause tiles to lift at high-traffic points within months.
For an artisan kitchen, the tile-look options are the most relevant: hexagon, penny round, and large-format simulated stone deliver a ceramic-tile appearance at vinyl price. Large-format tile-look (12×24-inch simulated stone) is particularly effective at making small kitchens feel larger — fewer visual breaks, cleaner floor plane. For a farmhouse or cottage kitchen, wide-plank wood-look in a warm oak or weathered finish adds the organic texture that the rest of the artisan aesthetic calls for. Brands to look for: FloorPops, Art3d, and Achim, all available at Amazon and home improvement stores in the $0.80 to $2.50 per square foot range. Surface prep is the critical step — vacuum thoroughly, mop with a degreaser, and let the floor dry completely before installation begins. Even light cooking grease residue prevents adhesion and tiles lift within days. For deeper exploration of kitchen tile floor choices, these kitchen tile floor secrets for lasting results are worth reading before you commit to a material.
16. Bring Plants and Fresh Greenery Into Your Kitchen for Life and Warmth
The most underrated budget kitchen upgrade costs almost nothing and takes almost no skill: plants. In a room dominated by hard surfaces (tile, stone, metal, glass) living greenery introduces organic texture, movement, and warmth that no product in a showroom can replicate. It is also the one update where the cost can genuinely be zero, which is why every budget kitchen renovation should make room for it first.
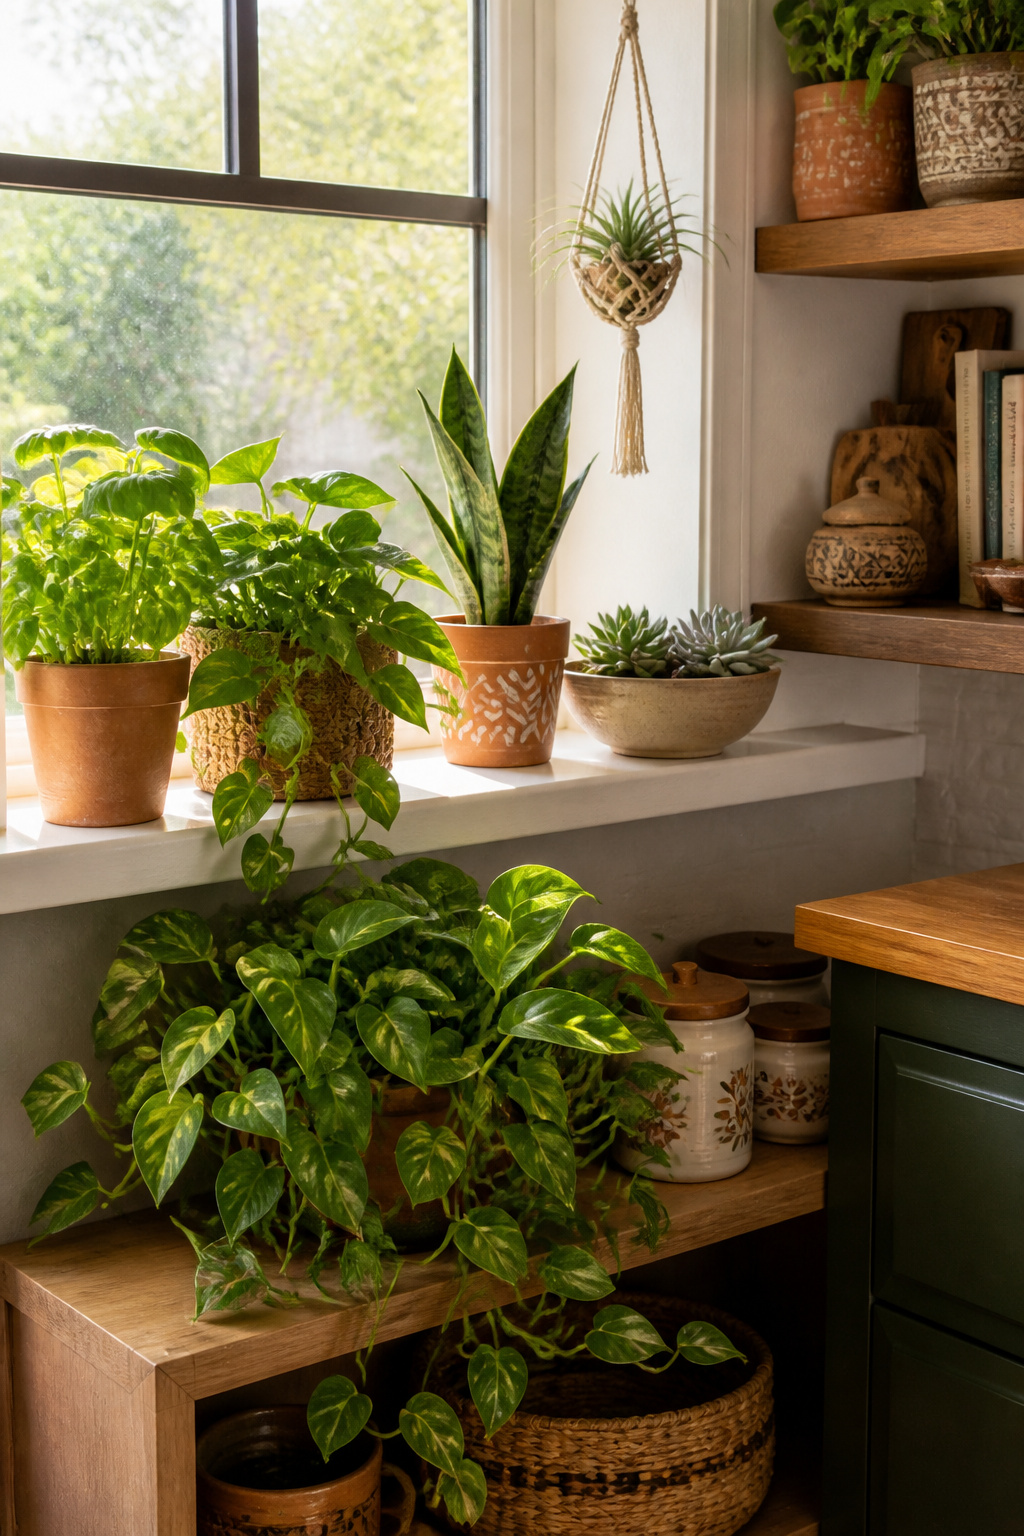
The kitchen’s humidity makes it a naturally hospitable environment for many plants. Snake plants (Sansevieria) tolerate low light and infrequent watering and are essentially unkillable — ideal for corners away from the window. Pothos trails beautifully from high shelves or above-cabinet positions, tolerates low light and steam, and is among the best-documented plants for removing formaldehyde, benzene, and acetone from indoor air, a benefit confirmed by NASA-affiliated research. Peace lily thrives in medium to low indirect light and tackles alcohols, acetone, and benzene in addition to formaldehyde. For the windowsill with six or more hours of direct light: basil, thyme, rosemary, and mint all thrive in kitchen conditions and are harvested for cooking, so they get regularly pruned and grow more prolifically as a result.
Terracotta pots are the perfect container for the artisan kitchen: $1 to $5 each, they breathe well (which prevents root rot), suit Mediterranean and folk aesthetics naturally, and can be painted in any colour to tie them into the existing palette. Cluster three pots of different heights on the windowsill — use odd numbers for visual balance. Put pothos at the corner of the highest shelf and let it trail down over time. Combine herbs and a trailing plant at the sink window and the two together will eventually read as a deliberate installation rather than a couple of pots someone remembered to water.
Your Budget Kitchen Renovation: How to Prioritise and Where to Begin
Before you start anything, take a photograph of your kitchen and look at it on a screen. Not through the eyes of familiarity, but as a stranger would. The photograph is honest in a way that standing in the room is not. It immediately reveals what the eye goes to first, what reads dated, what pulls the whole composition down. In most cases it is the lighting, the hardware, or the cabinet colour. These are also the three most budget-accessible updates on this list.
The sequencing matters more than the scale. Start free: remove cabinet doors from one section and see how it feels, clean and polish existing hardware, bring in a few plants, rearrange what is on the counter. Then move to the under-$200 tier: new hardware, plug-in under-cabinet LED strips, café curtains, a statement piece from a local import shop. Then the $200 to $500 range: a peel-and-stick backsplash or wallpaper accent wall, a faucet swap, a pendant light replacement. Then the larger investments if the moment and the budget align: cabinet painting, tile work, vinyl plank flooring. All sixteen ideas on this list qualify as kitchen remodel ideas on a budget — the only question is where you start.
No single update on this list requires a contractor. Each one requires attention, care, and the willingness to be in the room and work with your hands. That is precisely what makes a kitchen renovation on a budget feel like it belongs to you rather than to whoever built it. The kitchens I remember most vividly are never the most expensive ones. They are the ones where someone made choices with conviction and followed them through. That kitchen can be yours.